Build Your First Single Page Application with Ebaas
This tutorial walks you through steps to create a Single Page Application that tracks the issues related to a project. The process will take you less than 10 minutes to build a web application for performing CRUD operations without writing code. After completing this tutorial, you will be able to understand the fundamentals of how to build your business applications quickly using the Ebaas platform.
Set up Ebaas
To start with the tutorial, you need to install Ebaas on your computer. The system requirements are following:
- Windows 10 (64bit)
- Microsoft.Net Framework 4.5.2
- Google Chrome, Windows Edge, or IE 11
Step 1: Download Ebaas software from here.
Step 2: Install the downloaded software following the steps.
Issue class details
The Issue class is similar to a table in the database terminology. Since a data model in Ebaas is object-oriented. We will use the terminology like Class, Attribute, Instance, etc. Depending on application requirements, an issue class can have lots of attributes to describe the nature and state of an issue. But for the simplicity, we will only define the following attributes of the Issue class (Table 1) in this tutorial.
Table 1: Attributes of the Issue class
| Attribute Name | Type | Is Required | Constraint | Description |
|---|---|---|---|---|
| ID | Integer | Yes | Primary Key | A unique numeric ID that identifies an issue; Created by the application automatically |
| Subject | String | Yes | None | A summary of the issue |
| Description | String | No | None | A detailed description of the issue |
| SubmitBy | String | Yes | User List | The user who created the record |
| SubmitDate | Date | Yes | None | Date the record was created |
| Status | String | Yes | Enumeration | The issue status. Automatically set to Open when new record is created |
| Progress | Integer | No | None | The progress of the issue, from 0 to 100 |
| CloseDate | Date | No | None | Date the issue was closed |
| Owner | String | Yes | User List | The person who owns this issue |
Create Issue Class in Design Studio
The data model is the foundation of an application. Usually, a data model for a sophisticated issue tracking application may consist of multiple classes and relationships between them. Here, we will only create one Issue class for demonstration purpose.
Ebaas provides a WinForms based tool, called Design Studio, to create or modify data models. We will walk you through the steps of creating a class for issues. First, make sure the Ebaas server is started.
Step 1: Open the DesignStudio tool
Open the tool from Start->Ebaas->DesignStudio.
Step 2: Open an existing data model
Before you create a class, you need to create a data model for the application from scratch. To save your time, you can open an existing data model, called TDM, add the Issue class to the data model.
The Fig. 1 shows the steps of opening the TDM data model as the admin user. The username for the admin user is “admin” and the default password is “admin” too.
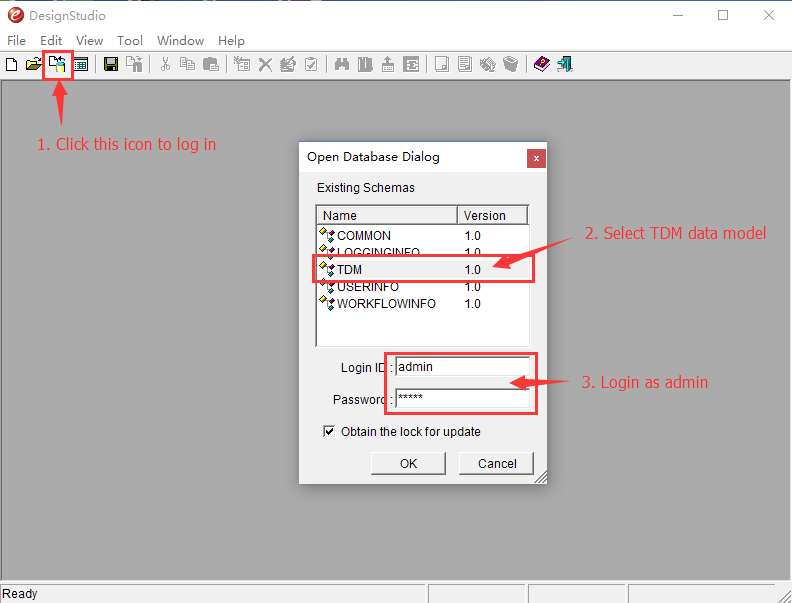 Fig. 1 Open an existing data model
Step 3: Create the Issue class
The tree on the left of Design Studio represents the data model. The nodes under “Classes” node are definitions of data classes. To create a new class, select “Add…” menu item in the popup window by right-clicking on the “Classes” node (See Fig. 2).
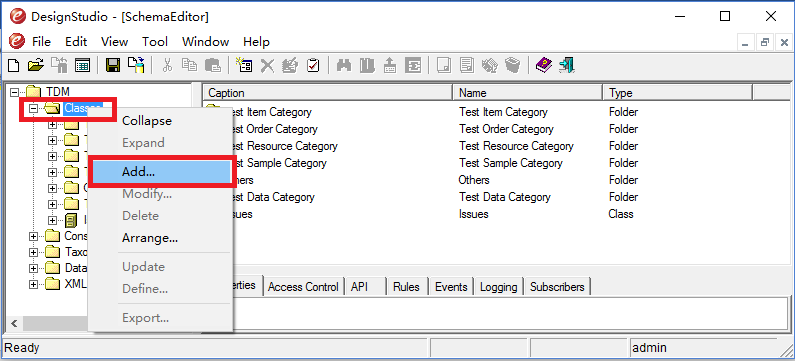 Fig. 2 Adding a class
Then, enter “Issues” for both class name and caption, and click “OK” button. Notice that an icon called “Issues” appears under the “Classes” node which represents the new class.
Step 4: Create “ID” Attribute
After the class is created, you will create attributes of the class according to the Table 1. The first Attribute to create is the ID attribute. Since ID is a unique identifier for an issue and is generated by Ebaas, the care should be taken when creating the attribute.
First, select “Add…” menu item from the popup by clicking “Issues” node on the data model tree (See Fig. 3)
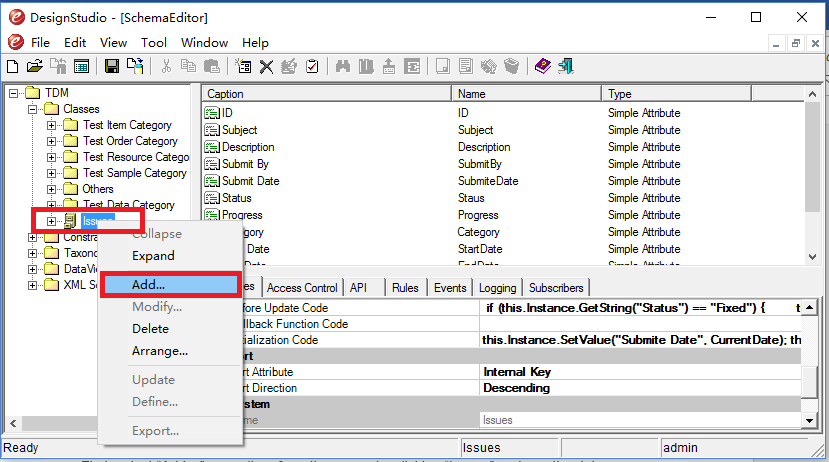 Fig. 3. Add an attribute
Next, select “Simple Attribute” type in the “Add New Item Dialog”, enter “ID” as a name and caption of the attribute, and click “OK” button. Notice that the newly created attribute appears under the node representing the Issue class.
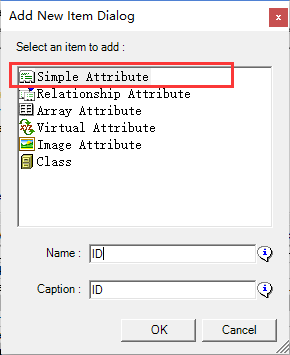 Fig. 4. Add simple attribute
Then, select the “ID” attribute node, the settings appear on the lower right of the window where you can define parameters for the selected attribute. Here, you need to select “Integer” as data type and set “Is AutoIncrement” to “True” (See Fig. 4), meaning that the value of “ID” attribute is an integer and is created automatically.
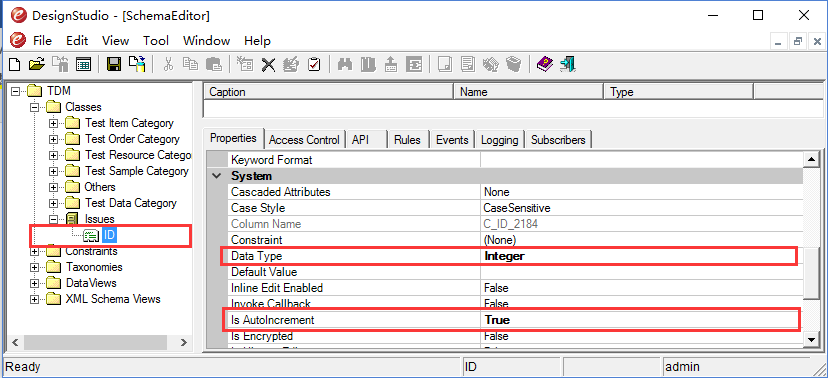 Fig. 5. Settings of “ID” attribute
Step 5: Create “Subject” attribute
Creating “Subject” attribute is similar to that of “ID” attribute, except that the settings are little different. The data type is “String” and “Is Required” is True (See Fig. 6). When an attribute is required, it gets validated at submitting a form.
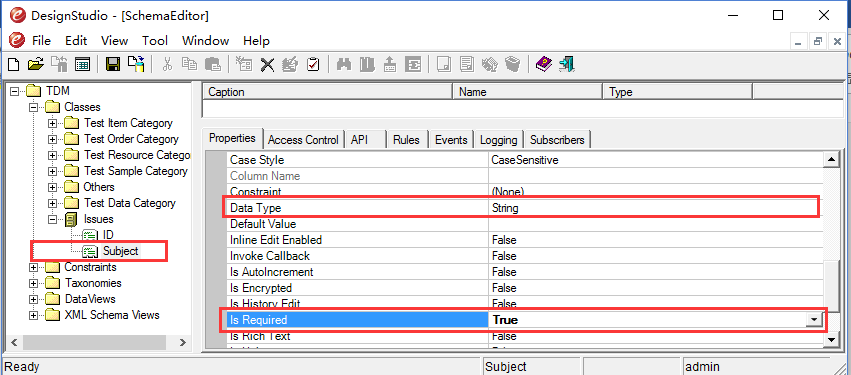 Fig. 6, Settings of “Subject” attribute
Step 6: Create “Description” attribute
Some of the attribute settings are related to appearances of an attribute in a form. You may want the “Description” attribute to appear as a text area element in a form. The setting for it is to set “Is Multiple-Lined” to True (See Fig. 7).
 Fig. 7: Setting of “Description” attribute
Step 7: Create “SubmitBy” attribute
The value of “SubmitBy” attribute is one of the registered users in Ebaas. Instead of entering a user name manually in a form, you want to be able to select a user from a drop-down list. Therefore, you need to define a List constraint for “SubmitBy” attribute.
Unlike an Enum constraint which has a fixed set of values, a List constraint can have a list of values generated dynamically using a List handler. There are some predefined list handlers shipped with the software. One of them is used to create a list of registered users, called UsersListHandler. You want to use this handler to define a List constraint for “SubmitBy” attribute.
The way to create a List constraint is to add a List constraint with a name “IssueSubmitter” to the “Constraints” node in the tree (See Fig. 8).
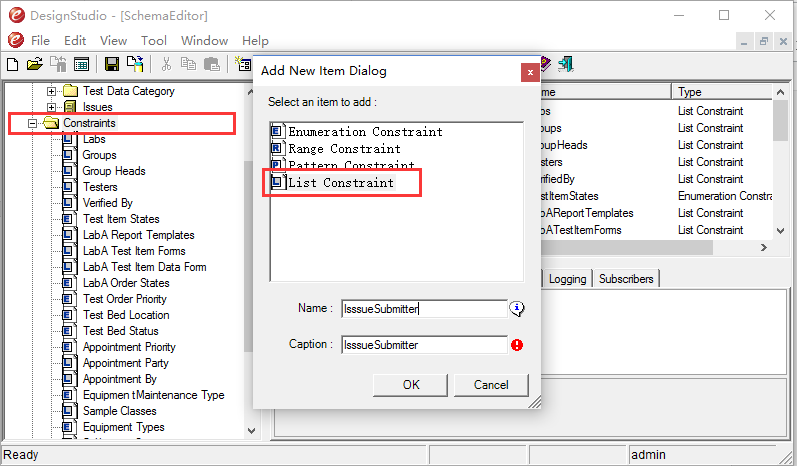 Fig.8: Add a List constraint
The settings of the List constraint is shown in Fig. 9, where the “Newtera.Common.MetaData.UsersListHandler,Newtera.Common” is the definition for a predefined list handler that generates registered users.
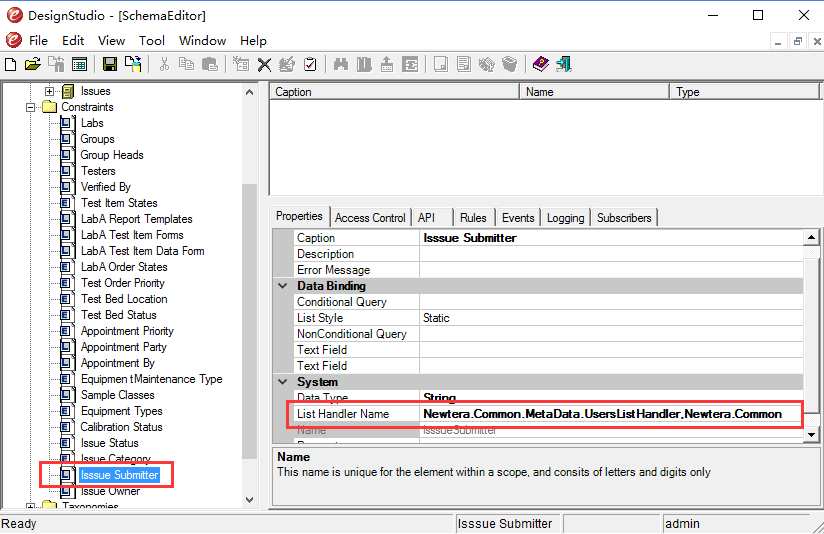 Fig. 9: Settings of the List constraint for “SubmitBy” attribute
Once you have created the List constraint, you can create the “SubmitBy” attribute in the Issues class, select “IssueSubmitter” as its constraint (see Fig. 10).
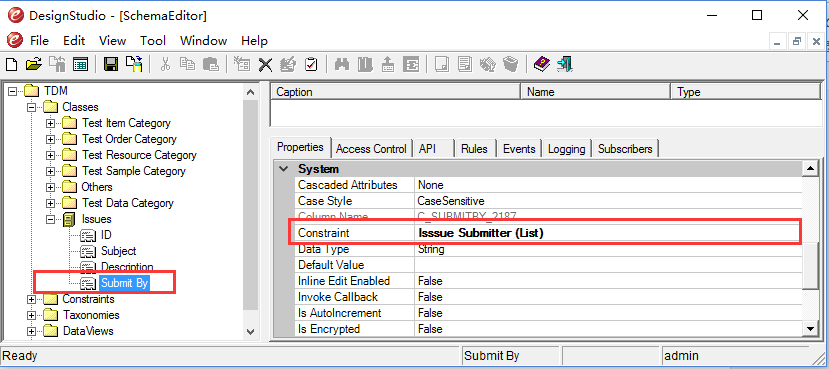 Fig. 10: Set the List constraint to “SubmitBy” attribute
Step 8: Create “SubmitDate” attribute
Create the “SubmitDate” attribute in the Issue class, set the “Data Type” to “Date”.
Step 9: Create “Status” attribute
The value of “Status” attribute is one of Enum values representing the status of an issue. Similar to “SubmitBy” attribute, you need to create a constraint for the attribute. But this time, you will create an Enum constraint.
An Enum constraint is a constraint with a fixed set of values. To define an Enum constraint for the “Status” attribute, you can add an Enumeration constraint with a name “IssueStatus” to the “Constraints” node (See Fig. 11).
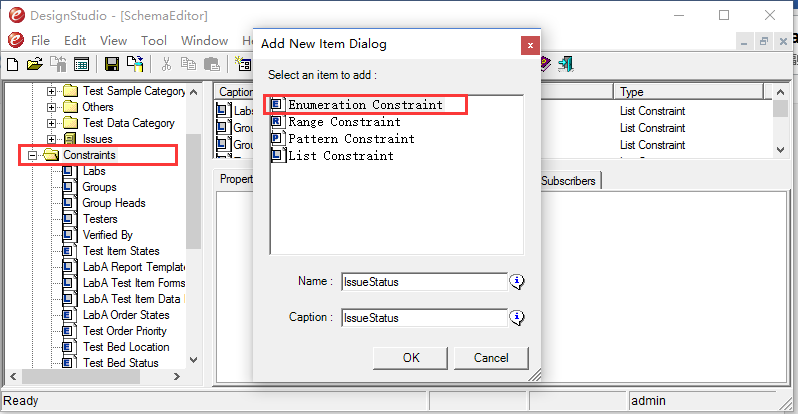 Fig.11: Add an Enum constraint
Then, select the newly added “IssueStatus” constraint, click the “Values” setting to launch a dialog window, and define the values in the enumeration (see Fig. 12). Note that it is recommended to use integers as Enum values and type the return key in the text box after changing the display text.
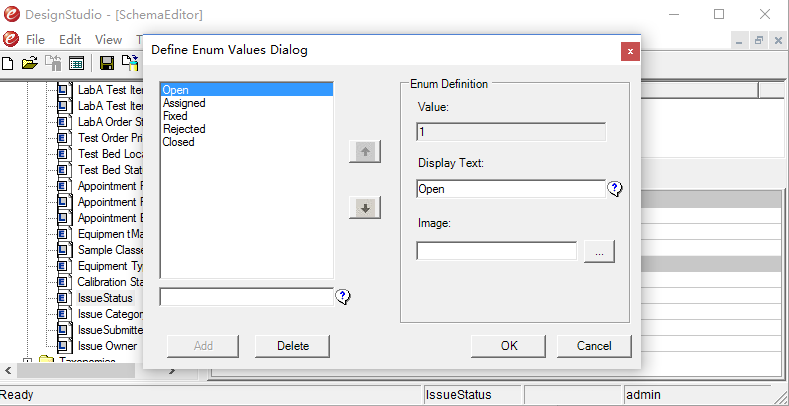 Fig. 12: Define Enum values for “IssueStatus” constraint
Next, you can create the “Status” attribute in the Issues class, select “IssueStatus” as its constraint.
Step 10: Create “Progress” attribute
Create the “Progress” attribute, set the “Data Type” to “Integer” and “Show as Progress Bar” to “true”.
Step 11: Create “CloseDate” attribute
Create the “CloseDate” attribute, set the “Data Type” to “Date”.
Step 12: Create “Owner” attribute
Like the “SubmitBy” attribute, the value of “Owner” attribute is one of the registered users in Ebaas.
You need to create a List constraint called “IssueOwner” under “Constraints” node. The settings of the List constraint is the same as that of the “IssueSubmitter” constraint (see Fig. 14)
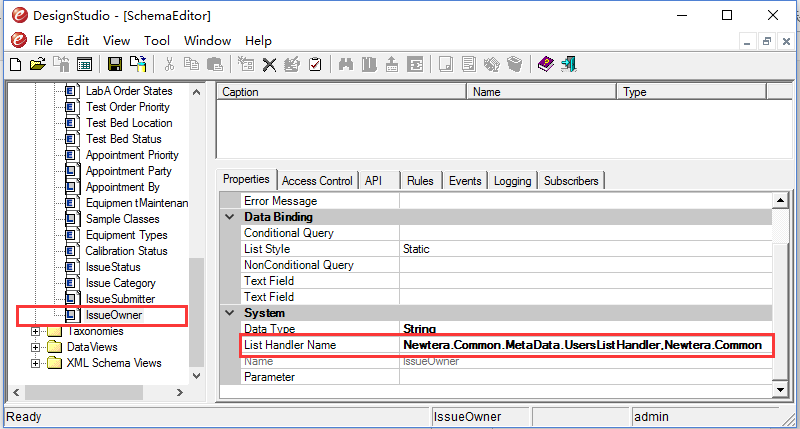 Fig. 14: Settings of the List constraint for “IssueOwner” attribute
Then, you can create the “Owner” attribute, select “IssueOwner” as its constraint.
Step 13: Set “ID” attribute as the primary key
By now, you have created all attributes of the “Issues” class. Before you save the data model to the database, you need to select the “ID” attribute as the primary key of the class.
Just select the “Issues” class node, click the “Primary Keys” setting (See Fig. 15), select the “ID” attribute as a primary key, and then click “OK” button.
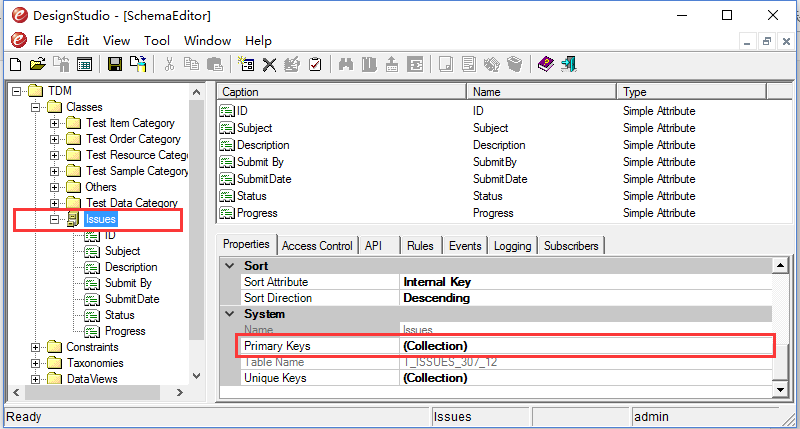 Fig. 15: Select “ID” as a primary key of the “Issues” class
Step 14: Save the data model
So far, all the changes you have made are still in the DesignStudio. Now it is time to save the updated data model back to the Ebaas server. The server will detect the differences and take necessary actions and save the updated model to the database.
Click the icon on the toolbar (see Fig 16) to save the model. The Design Studio validates the model before saving a data model to the server. If there are validating errors, it aborts the saving and shows the errors.
 Fig. 16: Saving the data model to the database
Saving a data model can take some time. Please wait until it is done.
Putting things together
Okay, you have created a class for issues in the data model. How are you going to use it in terms of creating, reading, updating, and deleting (CRUD operations) issues? In traditional application development, you have to implement the GRUD operations in code, which may not be a big deal if you are a programmer. But if you have tens or even hundreds classes in a data model, you probably don’t want to do it that way.
With Ebaas, all you have to do is to create classes and relationships in a data model to meet your business requirements, send the data model to Ebaas server, and let Ebaas server takes care of the CRUD operations and much more work for you.
The server has taken care of the logic of operations, what about the user interface? Ebaas platform has provided some metadata-driven UI components allowing you to interact with a class in a data model. One of the components is called “datagrid” which is a data grid interface with viewing and editing capabilities. We use this component in this tutorial.
The user interface of a typical application consists of many different UI components. In Ebaas, the structure of a user interface is specified in a model, called sitemap. The user interface is generated based on a sitemap.
Ebaas provides a tool, called the SiteMapStudio, allowing you to create or edit a sitemap easily. In this tutorial, you will use the SiteMapStudio to add the “datagrid” component to a site map for accessing the Issues class.
Step 1: Open the SiteMapStudio tool
First, make sure the Ebaas server is running, Then open the tool from Start->Ebaas->SiteMapStudio.
The Fig. 17 shows the steps of opening the SiteMapStudio as the admin user. The username for the admin user is “admin” and the default password is “admin” too.
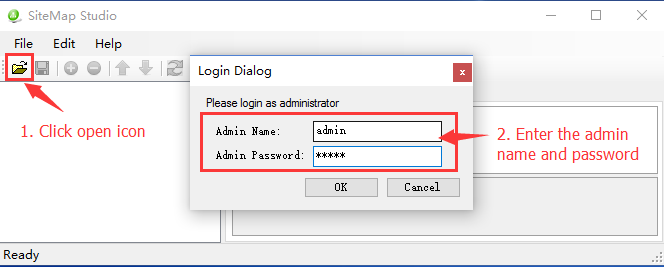 Fig. 17 Open the SiteMapStudio
Step 2: Editing an existing sitemap model
As an experiment, you can add a UI component for the Issues class to the main menu of an existing sitemap model (called TDM)
Fig. 18 shows the way to create a menu item under the “Main Menu” node of the site map.
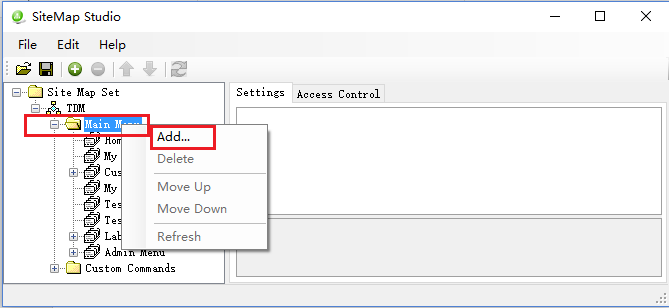 Fig. 18: Create a menu item
You enter “Issue Tracking” as a name of the menu item in the popup dialog and click “OK” button. A new node with name “Issue Tracking” should appear at the bottom of the tree.
Step 3: Setup the menu item
Click on the “Issue Tracking” item you just created, next step is to define the settings of the item (Fig. 19). The table 2 below gives you the settings you should enter:
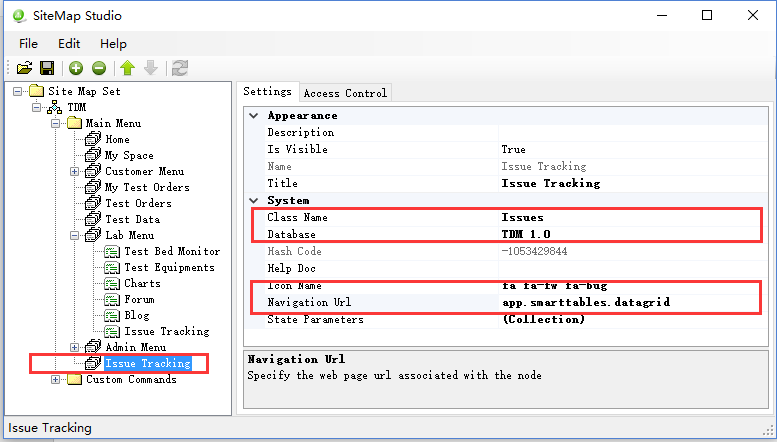 Fig. 19: Settings of the “Issue Tracking” menu item
Table 2: Settings of the “Issue Tracking” menu item
| Setting Name | Setting Value | Description |
|---|---|---|
| Name | Issue Tracking | A unique name of a menu item |
| Title | Issue Tracking | The display text of a menu item |
| Navigation URL | app.smarttables.datagrid | The url of the “datagrid” component |
| Database | TDM 1.0 | The name of a data model |
| Class | Issue Tracking | The display text of a menu item |
| Icon Name | fa fa-fw fa-bug | A definition of an icon in Font Awesome icon sets |
Step 4: Save the sitemap model
Click the save icon on the toolbar to save the sitemap model.
Note that you must restart the Ebaas Server to make the changes effective.
Try it out
Now you can try out the application you just built.
Step 1: Log into Ebaas
Use a recommended web browser to connect to the application at http: // localhost: 8080. You can use “demo1”, one of the demo accounts, to log in. The password for “demo1” user is “888”.
Step 2: Get to the page
Once you have logged in, you should be able to see the “Issue Tracking” menu item at the bottom of the “Home” page (Fig. 20), click the menu item to get to the “datagrid” page for issues.
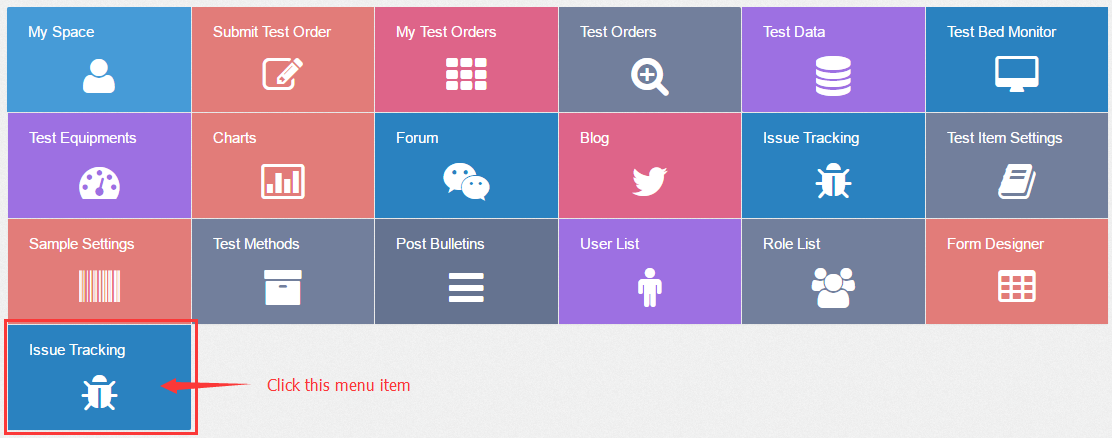 Fig. 20: Home Page
Step 3: Add, update and delete an issue
The grid is empty at the first time. You can add an instance by clicking the green “+Add” button on top right of the grid, and a form pops up with the fields for the attributes of the “Issues” class (See Fig.21). This form is generated by the server for each class by default. You can create a customized form using a Form Designer which will be covered in other post.
Enter some values in the form, submit it to the server to create an issue instance in the class. When you close the form, you will be able to see instance(s) displayed in the grid.
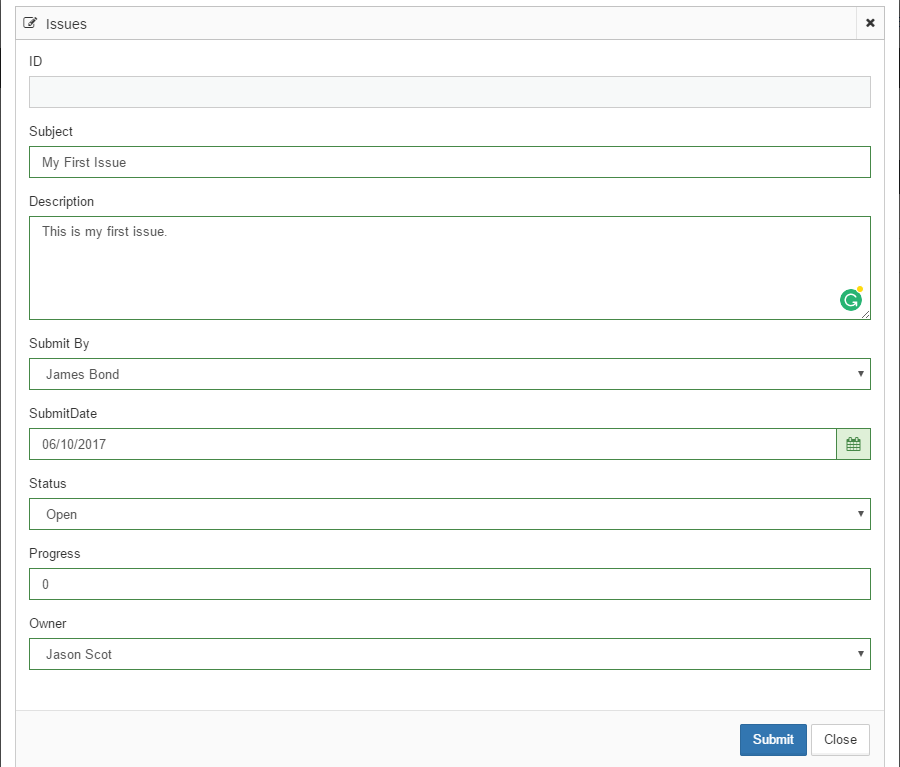 Fig. 21: The Issue Form
If you want to modify or delete an instance, just click on the instance to make the commands appear under the row (See Fig. 21).
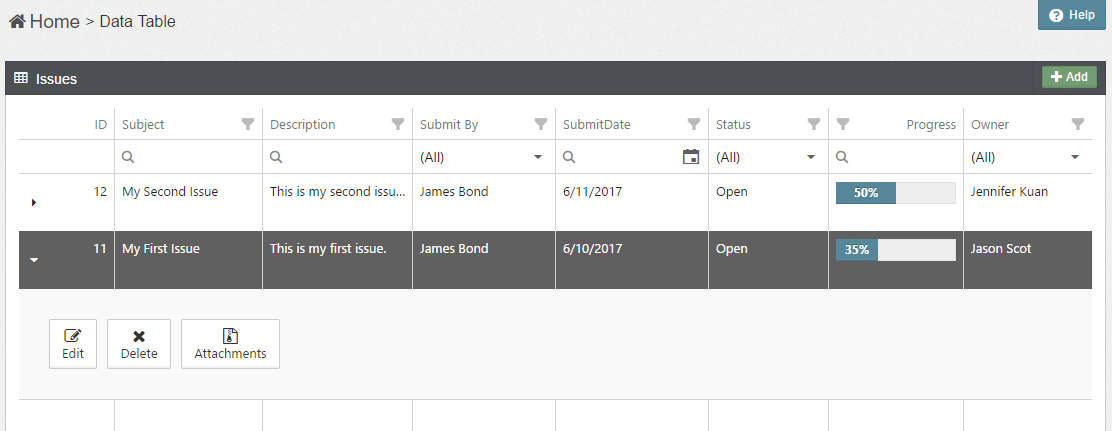 Fig. 22: The datagrid page
Step 4: Filtering & sorting
You can filter the instances in the grid by entering, selecting filter values in the header rows, and also sort the instances by clicking on a column.
The datagrid and form are two of very powerful UI components. I will explain their advanced features in the related topics.
That’s it. You have just built a simple issue tracking application without writing a single line of code. With the meta-data driven architecture of Ebaas, you can pretty much build a sophisticated application by building the models that describes the business requirements.