Build a State Machine Workflow with Ebaas
As an enterprise application platform, Ebaas supports building business applications with workflows that help organizations automate, streamline & improve their business processes.
Workflows model business processes., whether the process is the processing of orders, the customer service request, or a work task. The business process consists of steps that are carried out by persons with different roles in the organization.
The Issue Tracking Application you built in the tutorial of “Build your first application with Ebaas” is a simple business application which you can enhance with a workflow to model the process of resolving an issue in an organization. You will build a simple state machine workflow using Ebaas WorkflowStudio to track the progress of the issues.
Issue Tracking Process
When you design a state machine workflow to model a process, your first task is to identify the steps and transitions that occur during the process, as well as the people who are involved in the process. Once you have the logic defined, you can use the WorkflowStudio to build a workflow that models the business process.
Suppose you determine the following steps are involved in tracking an issue:
- A team receives the issue, including all necessary information.
- The manager decides whether to process the issue. If so, the issue is assigned to an owner and process continues. If not, the issue is canceled, and the workflow ends.
- The owner receives the issue. Wait until the owner resolves it, the workflow ends.
Normally, there is a step to check if the issue is fixed correctly. If so, the issue is closed. If not, the issue is back to the owner again. In an attempt to make this tutorial short, we skip the checking step.
Basics of a State Machine Workflow
A state machine workflow provides a set of states. The workflow begins in an initial state and ends when it reaches the completed state. Transitions between the states define the behavior. In general, state machine workflows react to events. The occurrence of an event causes the workflow to transition to another state.
One of the main benefits of the state machine workflow is the ability to define multiple paths through the workflow. You can easily include looping and re-execution of states in a state machine workflow.
The definition of states and transitions forms a model of a state machine workflow. Multiple workflow instances of a workflow model can be running at a different state during the runtime. Each workflow instance represents a process in its execution and is bound to a data instance, such as an issue or order. The binding usually happens when the event of creating a data instance triggers the workflow.
The states in a workflow are where a process needs to make task assignment, pause and wait for an event from performing the task to proceed to a next state. The receiver(s) of a workflow task usually interact with it through a web or mobile based form with predefined actions, such as “Approve” or “Reject.” Performing an action raises an event to the workflow instance, causing it moves to the next state.
Define events
Before you create a workflow for the issue tracking, you need to define the events that drive the workflow. Most common events are those resulting from creating or updating a data instance, which is called DB Events. DB Events are part of a data model. Therefore, you need using the DesignStudio to define the events for the workflow.
- Open DesignStudio at Start->Ebaas->DesignStudio;
- Open the existing “TDM” data model that contains the “Issue” class from the database;
- Log in as the administrator with the username “admin” and the password “admin”;
- Select the “Issue” class node, and switch to “Events” tab on the right (See Fig. 1).
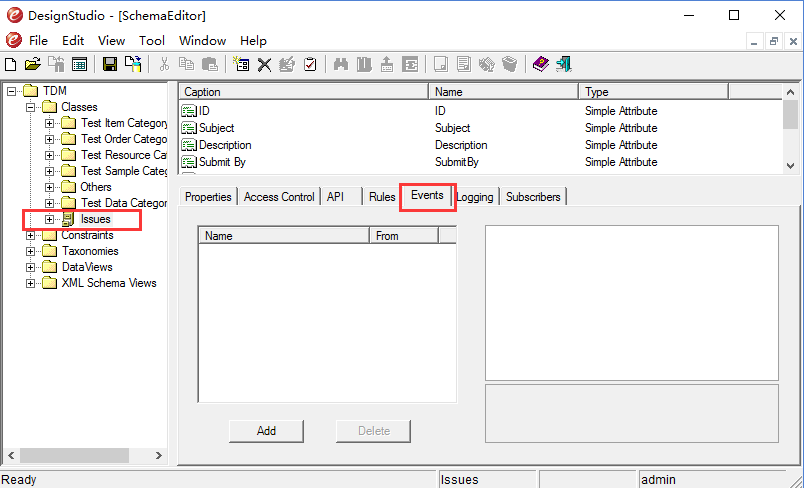 Fig.1: Define DB Events
Creating “IssueCreated” Event
The “IssueCreated” event occurs when an issue instance is added to the database, which will start a workflow instance.
- Click on the “Add” button at the bottom of the “Events” tab, adding an empty event;
- Change its name to “IssueCreated”;
- Select the event type as “Insert” (See Fig. 2);
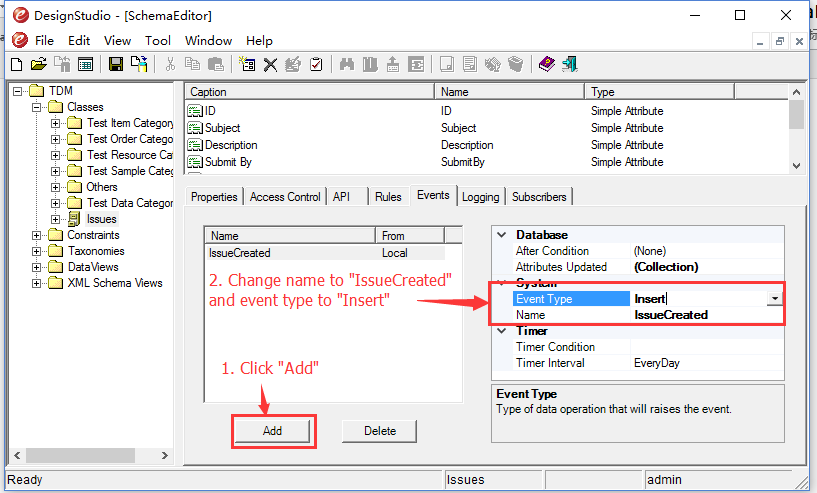 Fig.2: Definition of the “IssueCreated” event
Creating “IssueAssigned” Event
The “IssueAssigned” event occurs when the status of an issue instance changes to the “Assigned”, which will move a workflow instance to a state.
- Click on the “Add” button at the bottom of the “Events” tab, adding an empty event;
- Change its name to “IssueAssigned”;
- Select the event type as “Update”;
- Define a condition for this event by clicking the “After Condition” setting and build an expression as shown in Fig. 3;
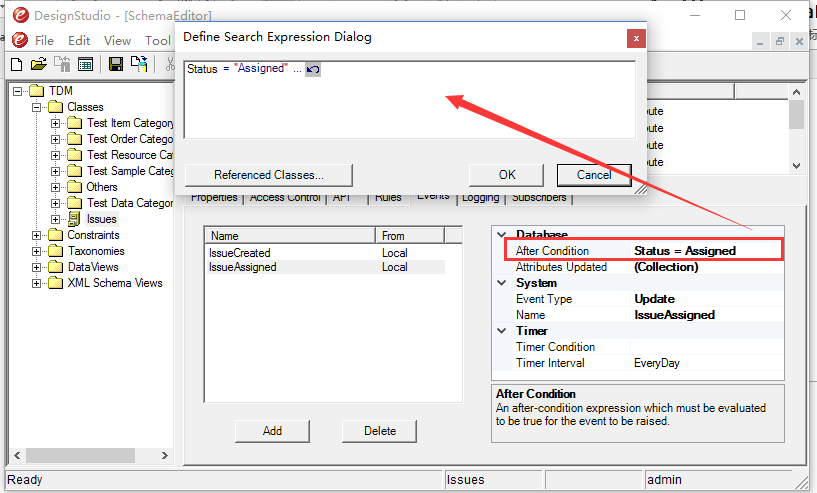 Fig.3: Condition of the “IssueAssigned” event
- In addition to the condition above, you need to indicate that the event occurs only when the value of the “Status” attribute is updated (See Fig. 4);
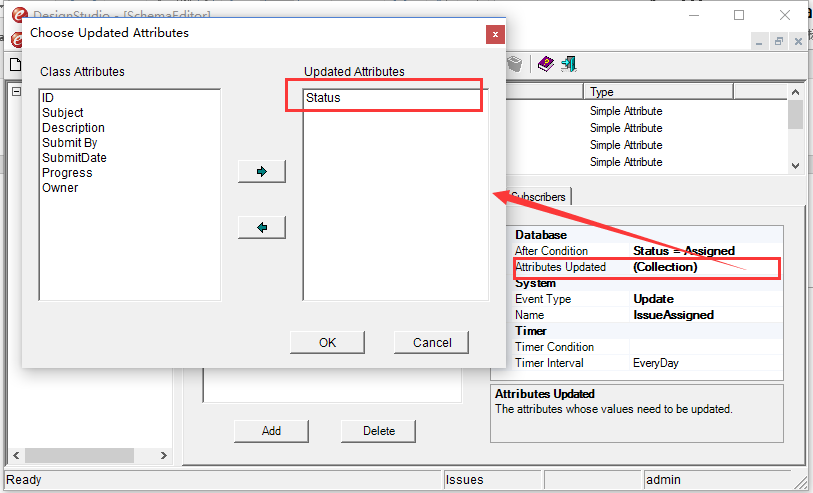 Fig.4: Indicate the “Status” as the updated attribute
Creating “IssueRejected” Event
The “IssueRejected” event occurs when the status of an issue instance changes to the “Rejected”, which will move a workflow instance to the final state.
- Click on the “Add” button
- Change the event’s name to “IssueRejected”;
- Select the event type as “Update”;
- Define a condition for this event as “Status=Rejected”;
- Select the “Status” attribute as the “Attributes Updated”;
Creating “IssueFixed” Event
The “IssueFixed” event occurs when the status of an issue instance changes to the “Fixed”, which will move a workflow instance to the final state.
- Click on the “Add” button;
- Change the event’s name to “IssueFixed”;
- Select the event type as “Update”;
- Define a condition for this event as “Status=Fixed”;
- Select the “Status” attribute as the “Attributes Updated”;
Build a workflow model
With the events defined, you can start to build a state machine workflow for the Issue Tracking process using the WorkflowStudio tool. The WorkflowStudio manages the workflows of an application in a project. You can skip the steps of creating a new project by building the workflow in an existing project, called “TDM”.
- Open WorkflowStudio at Start->Ebaas->WorkflowStudio;
- Open the existing “TDM” project;
- Sign in as the administrator with the username “admin” and the password “admin”;
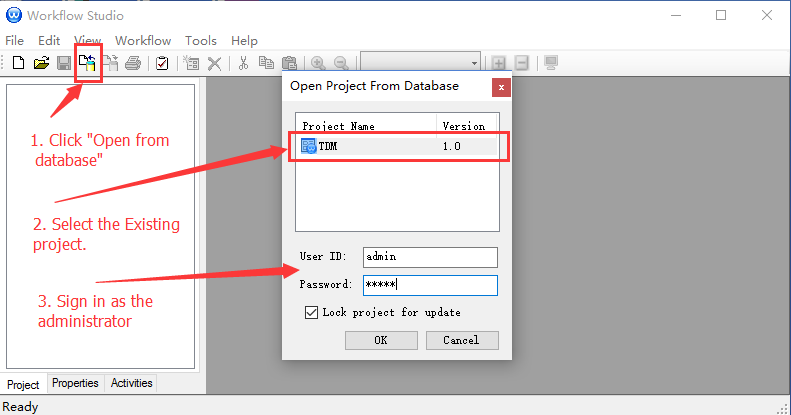 Fig.5: Open and sign in the WorkflowStudio
Create a state machine workflow
- Create a state machine workflow named “Issue Tracking” following the steps illustrated in Fig. 6.
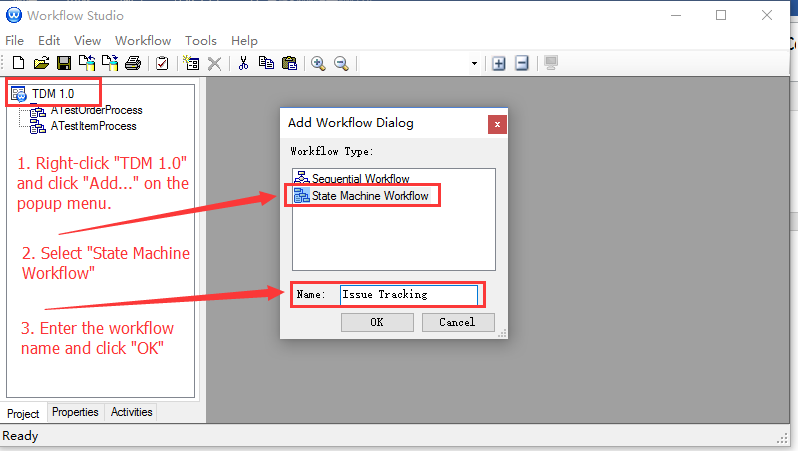 Fig.6: Create a state machine workflow
- Select the “Issue Tracking” workflow created in the previous step and click the “Properties” tab at the bottom to switch the properties of the workflow (See Fig. 7)
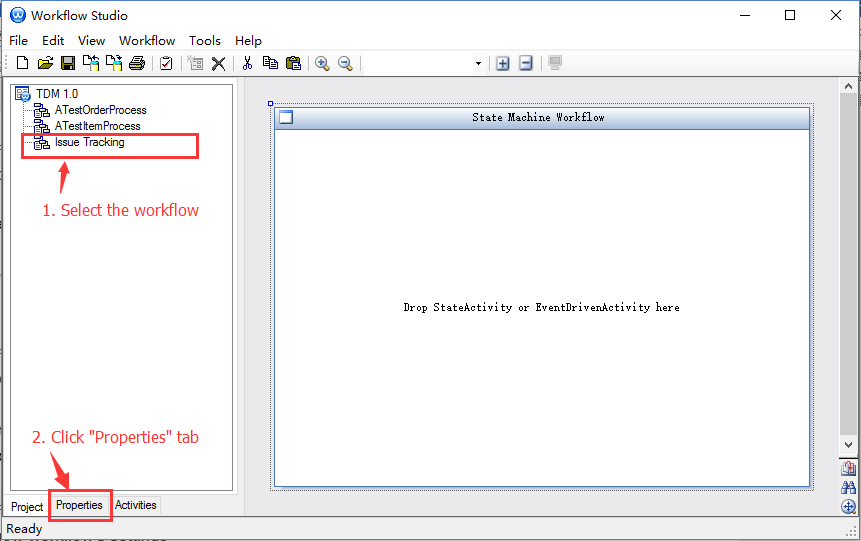 Fig.7: Show workflow’s properties
- In the “Properties” tab, define the data class that is bound to the workflow. Therefore, set “Schema ID” to the “TDM 1.0” which is one of the data model created in the DesignStudio.
- Set “Class Name” to “Issues”, which indicates the “Issues” is the binding class to the workflow.
- Set “Event Name” to “IssueCreated”, which indicates that the “IssueCreated” event starts a workflow instance.
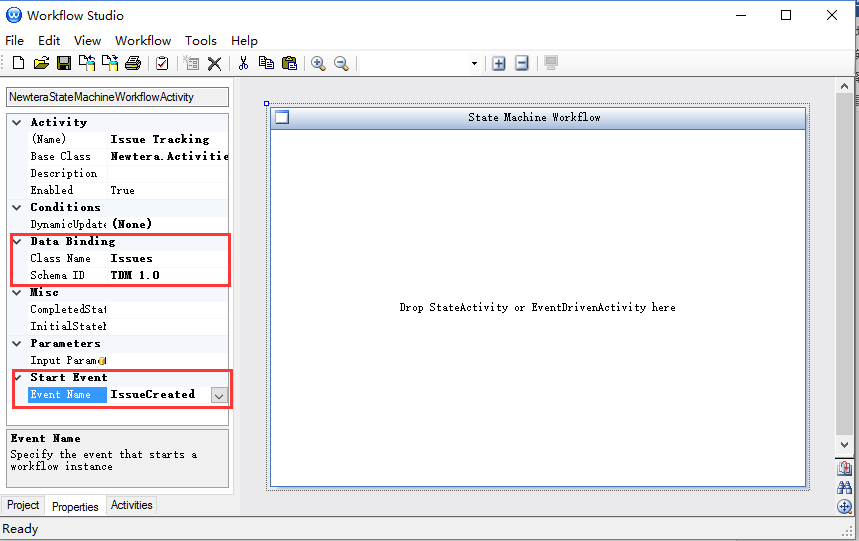 Fig.8: Set up the properties of the workflow
Define states of the workflow
A state machine workflow contains workflow activities. You will find the workflow activities you can use to build a workflow in the “Activities” tab.
The State activity is the primary activity you will use in a state machine workflow. Each State activity in a workflow represents a point where the business process waits for something to happen.
Drag a State activity from the toolbox onto the design surface, change its name to “Started” in the “Properties” tab. To mark this activity as the initial state, right-click on it and select Set as Initial State. The green circle reappears (See Fig. 9).
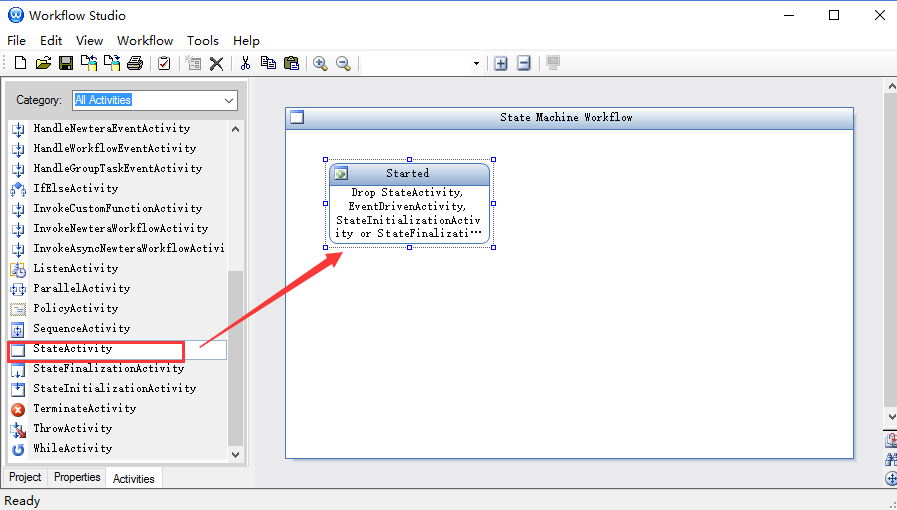 Fig.9: The initial state of the workflow
To add another state to the workflow, drag a State activity from the toolbox onto the design surface. Name the activity Working.
Now add the final state to the workflow, calling it Finished. To mark it as the completed state, right-click on it and select Set as Completed State. You should now see a red circle in the activity’s title bar.
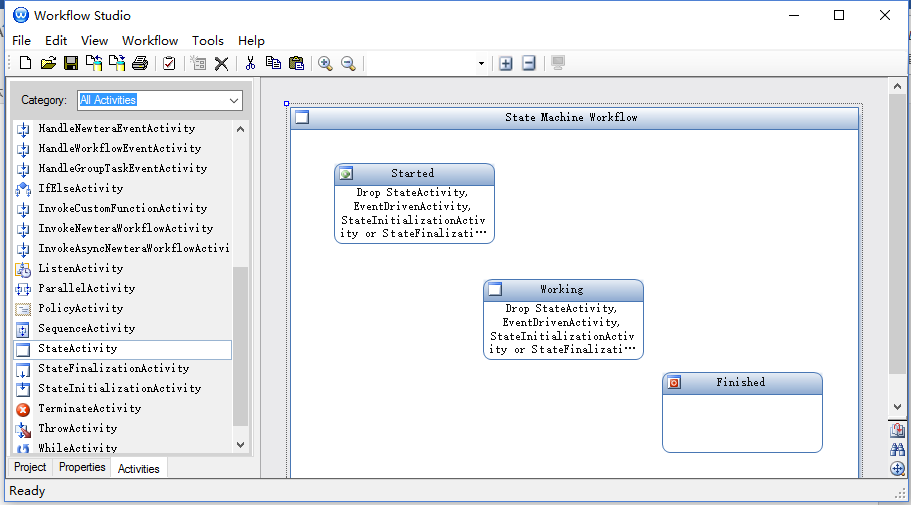 Fig.10: The state machine workflow with three states
WF requires that your state machine workflows have one state marked as the initial state and one state as the completed state. When the workflow starts, the workflow starts with the state marked as the initial state. When the workflow reaches the completed state, the workflow will end.
Define the Activities that Occur in Each State
State machine workflows move from state to state. While they are in each state (except for the completed state), they can perform actions, wait for an external event to occur and transition to another state.
You can add four activities to a State activity:
- The StateInitialization activity, if it exists, is the first activity the workflow executes when it enters a state. The activity is a Sequence activity, so you can add to it all of the activities you want to execute when the workflow enters that state. For example, you want to add a CreateTask activity to create a workflow task for a user or a group of users.
- In a state machine workflow, the workflow will enter a state and stay there until an event happens. You handle events using an EventDriven activity. It is also a Sequence activity, so you can add to it the activity to handle the event.
- The StateFinalization activity, if it exists, is the last activity the workflow executes as it leaves a state. It is also a Sequence activity, so you can add to it all of the activities you want to execute before the workflow moves to a new state. For example, you want to add a CloseTask activity to delete the task created when the workflow entered the state. You will now finish this workflow. You will define what happens in each state and how the workflow moves from state to state.
Create a task for the “Started” state
When the workflow enters “Started” state, it creates a task for the users with Manager role to assign an owner to the issue or rejects it. You can use the CreateTask activity to achieve it.
From the toolbox, drag a StateInitialization activity into the Started activity, change its name to StartedStateInitialization. StateInitialization is a Sequence activity. To add activities to it, double click on it. The workflow designer looks like Fig. 11.
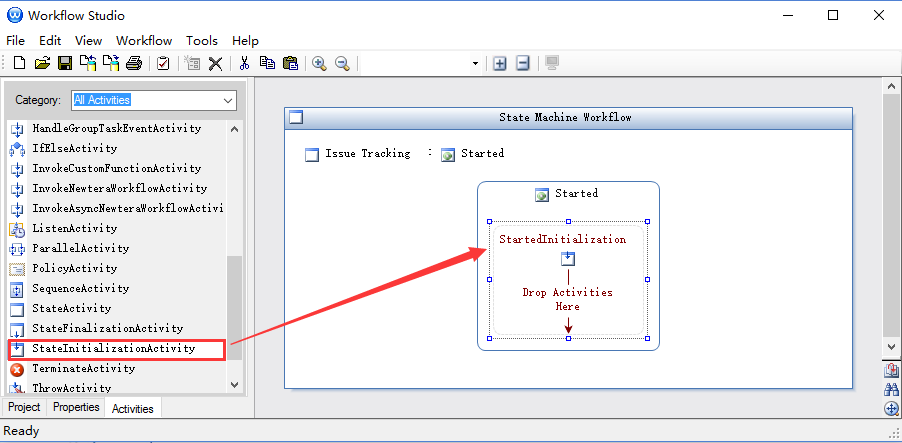 Fig.11: The StateInitialization activity is a sequence activity
Drag a CreateTask activity from the toolbox into StartedStateInitialization and change its name to “CreateAssignTask”. Click CreateAssignTask, switch to “Properties” tab to set up the activity.
- Set the “Subject” and “Task Description” properties with the text about the task (See Fig. 12). The text about the task will display on the user interface or in the notification email. You can include values of attributes of the binding data instance as part of the text by using {attribute name} syntax, for example, {SubmitBy} or {SubmitDate}.
 Fig.12: Set the task’s text
- Assign the task to the “Manager” role by clicking the “Roles” under “Static Assignment”, select “Manager” role, and click “OK” (See Fig. 13), which means users with the Manager role will get the task.
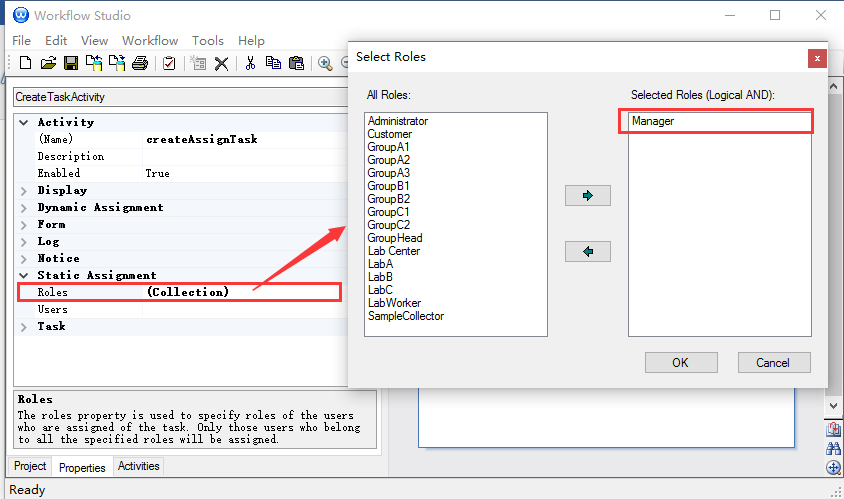 Fig.13: Assign the task to the “Manager” role
- You need to create two actions for this task, which are “Assigned” and “Rejected”. These actions are displayed as buttons at the bottom of the task form. When the “Assigned” button is clicked, it sets the “Status” of the issue to “Assigned”, which raises the “IssueAssigned” event you defined previously. When the “Rejected” button is clicked, it sets the status to “Rejected”, which raises the “IssueRejected” event. The steps of creating the “Assigned” action is illustrated in Fig. 14.
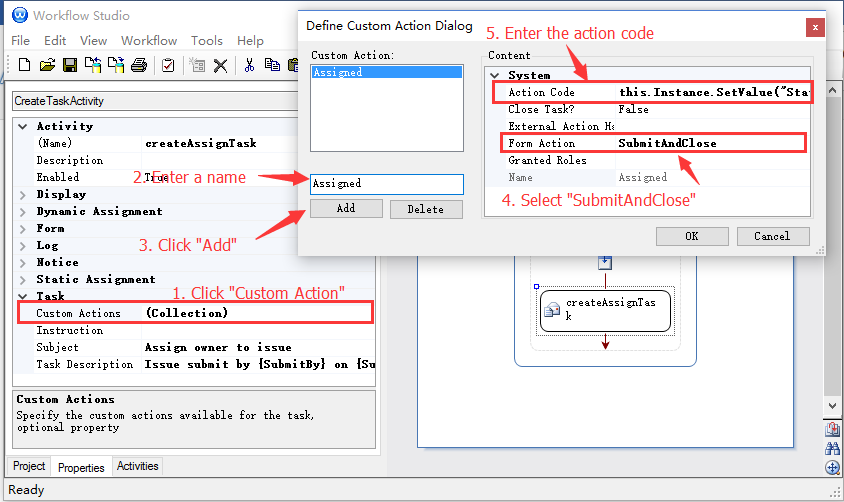 Fig.14: Creating the “Assigned” action
Where the action code is :
this.Instance.SetValue("Status", "Assigned");- You can create the “Rejected” action the same way, except that the action code is:
this.Instance.SetValue("Status", "Rejected");Close the task for the “Started” state
When the workflow leaves “Started” state, it should remove the task created in StartedStateInitialization activity, so that the task disappears from the user’s task list.
From the toolbox, drag a StateFinalization activity into the Started activity, change its name to StartedStateFinalization. StateFinalization is also a Sequence activity. To add activities to it, double click on it. The workflow designer looks like Fig. 11.
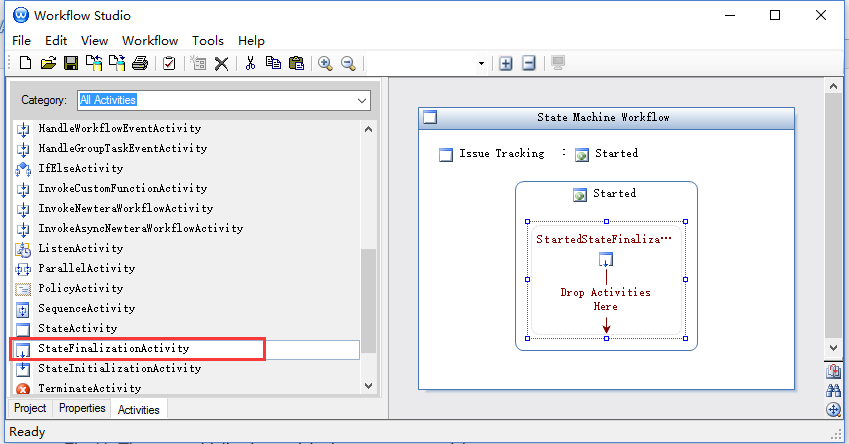 Fig.15: The StateFinalization activity is a sequence activity
Drag a CloseTask activity from the toolbox into StartedStateFinalization and change its name to “CloseAssignTask”. Click CloseAssignTask, switch to “Properties” tab, and select “createAssignTask” as the activity name (See Fig. 16).
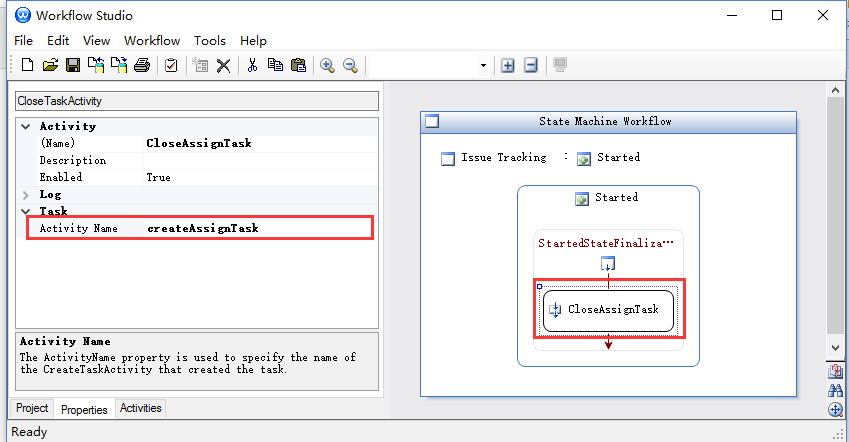 Fig.16: Use CloseTask activity to close a task
Handle events of “Started” state
As mentioned previously, the typical scenario for a state machine workflow is that it enters a state, creates a task and waits for an action the user takes to raise an event. You handle external events using an EventDriven activity and a HandleNewteraEvent activity. The task created in the “Started” state has two actions which raise the “IssueAssigned” and “IssueRejected” events. You need to handle these two events in the state.
Drag another EventDriven activity into the Started state activity, change its name to RejectedEventDriven. Then, drag a HandleNewteraEvent activity from the toolbox into RejectedEventDriven and change its name to “HandleIssueRejectedEvent”. Click HandleIssueRejectedEvent, switch to “Properties” tab, and select “IssueRejected” as the event to be handled (See Fig. 18). With the setting, the HandleIssueAssignedEvent activity is executed when the “IssueAssigned” event is raised.
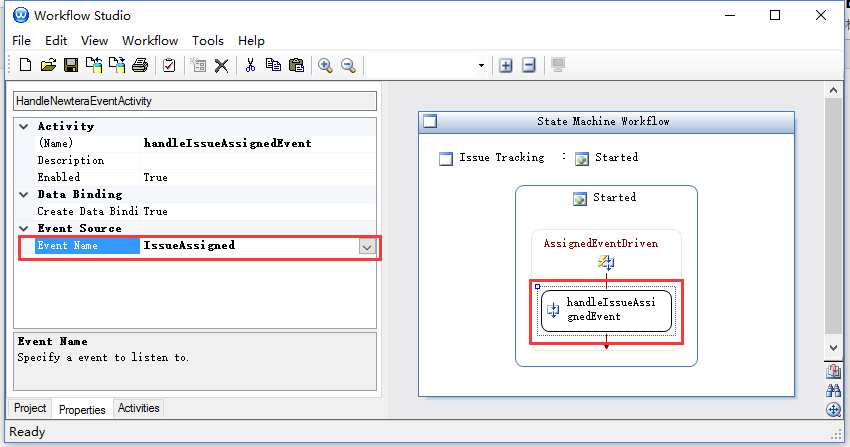 Fig.18: Handle “IssueAssigned” event
To handle “IssueRejected“ event, drag another EventDriven activity into the Started activity, change its name to RejectedEventDriven. Then, drag a HandleNewteraEvent activity from the toolbox into RejectedEventDriven and change its name to “HandleIssueRejectedEvent”. Click HandleIssueRejectedEvent, switch to “Properties” tab, and select “IssueRejected” as the event to be handled. With the setting, the HandleIssueRejectedEvent activity is executed when the “IssueRejected” event is raised.
At this point, you have completed the definition of the “Started” state. You are now going to define the activities in the “Working” state.
Create a task for the “Working” state
When the workflow enters Working state, it creates a task for the owner to fix the issue. The way you create this task is similar to that of the Started state.
Drag a StateInitialization activity into the Working activity, change its name to WorkingStateInitialization.
Drag a CreateTask activity into WorkingStateInitialization and change its name to “CreateFixTask”. Click CreateFixTask, switch to “Properties” tab to set up the activity.
- Set a text describing the task to the “Subject” and “Task Description” properties.
- Assign the task to the owner by clicking the “Users Binding Attribute” under “Dynamic Assignment”, select “Owner” attribute of the “Issues” class (See Fig. 19). This setting will assign the task to the user whose name appears in the “Owner” attribute.
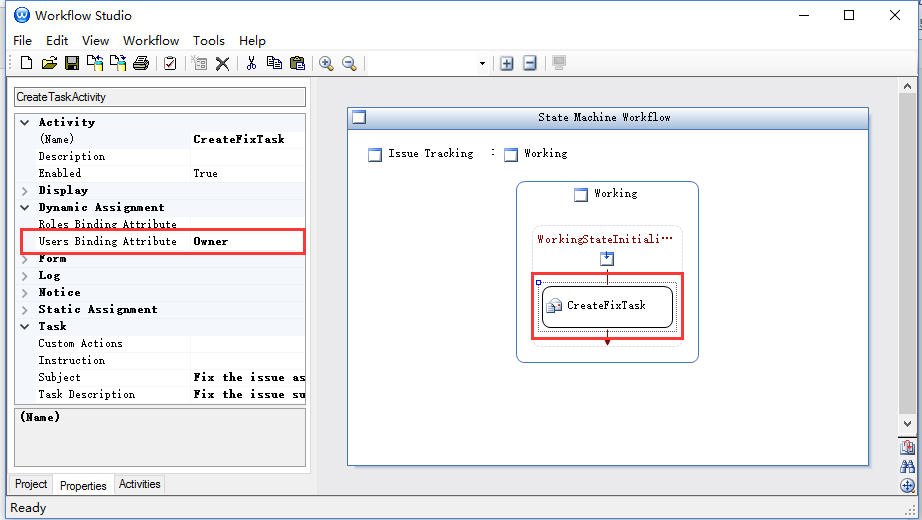 Fig.19: Assign the task dynamically to an user
- You need to create one action with a name “Fixed” for this task (See Fig. 20). When the “fixed” button is clicked, it sets the issue’s “Status” to “Fixed”, which raises the “IssueFixed” event.
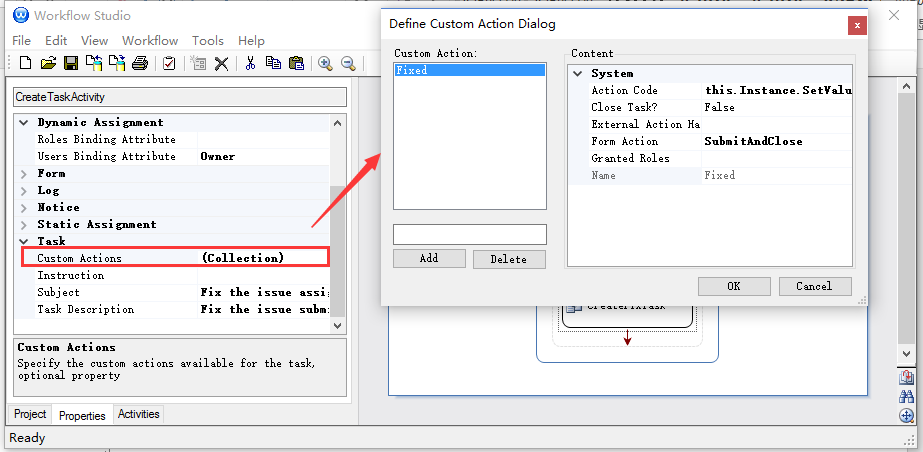 Fig.20: Define the action for the task of “Working” state
Where the action code is :
this.Instance.SetValue("Status", "Fixed");Close the task for the “Working” state
When the workflow leaves “Working” state, it should remove the task created in WorkingStateInitialization activity, so that the task disappears from the user’s task list.
Drag a StateFinalization activity into the Working activity, change its name to WorkingStateFinalization.
Drag a CloseTask activity from the toolbox into WorkingStateFinalization and change its name to “CloseFixTask”. Click CloseFixTask, switch to “Properties” tab, and select “CreateFixTask” as the activity name.
Handle the event of “Working” state
The task created in the “Working” state has one action which raise the “IssueFixed”.
Drag another EventDriven activity into the Working state activity, change its name to FixedEventDriven. Then, drag a HandleNewteraEvent activity from the toolbox into FixedEventDriven and change its name to “HandleIssueFixedEvent”. Click HandleIssueFixedEvent, switch to “Properties” tab, and select “IssueFixed” as the event to be handled.
Define the state transitions
You have now had all the activities created for the issue tracking process. The only thing left is to define the transitions among the states.
Defining a transition between two states is easy. For example, to make the transition from Started state to Working state, select the AssignedEventDriven activity in Started state, hover the mouse over the right border of the activity. The cursor should change to a crosshair. Hold down the mouse button. Drag the crosshair and drop it on Working state. There will then be a line connecting the two states.
Connect the RejectEventDriven activity in Started state to Finished state and the FixedEventDriven in Working state to Finished state. The final workflow in the design surface looks like one in Fig. 21.
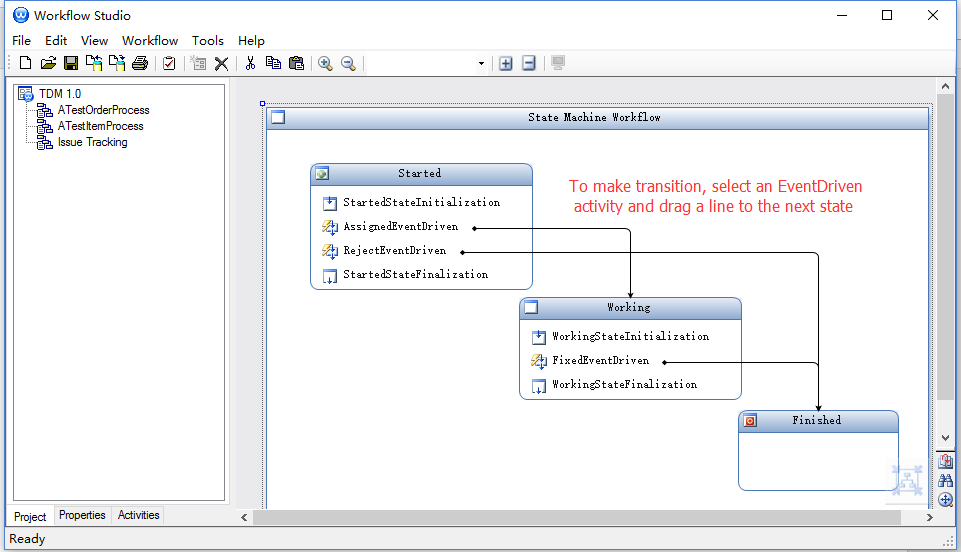 Fig.21: Define the state transitions indicated by lines
Save the workflow model to the database
Before you save the workflow model to the database, you may want to validate the model. If there are no validating errors, click the “Save to Database” icon on the toolbar. If there is a dialog asking you whether to save the workflow model as a new version since there are some workflow instances of other models running, answer “No” to it (See Fig. 22). Wait for the completion message.
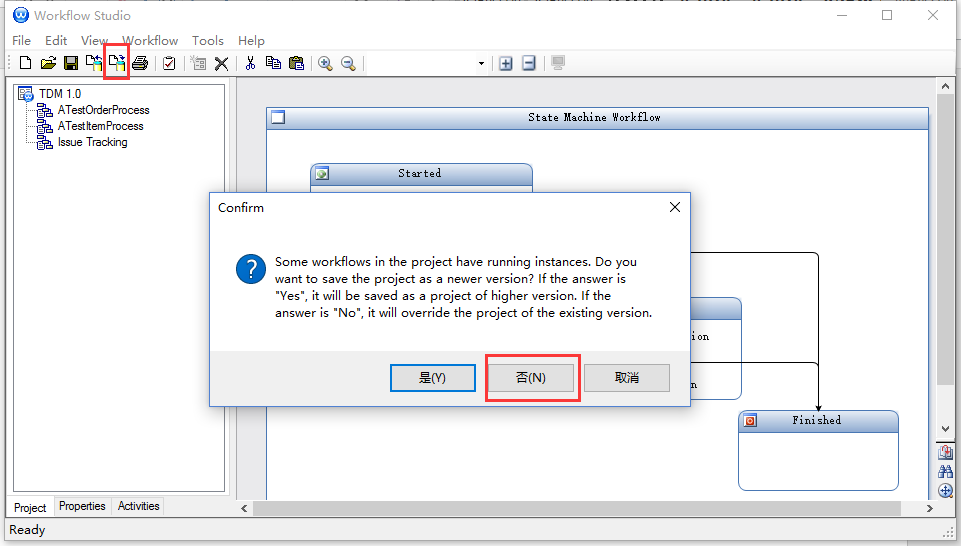 Fig.22: Save the workflow model to database
Try out Issue Tracking Process
With the workflow model saved to the database, you can test the issue tracking progress by using different user accounts on the web.
Create a new issue
- Use a recommended web browser to connect to the application at http: // localhost: 8080. You can use “demo1” user to sign in. The password for “demo1” user is “888”.
- Once you have logged in, you should see the “Issue Tracking” menu item at the bottom of the Home page, click the menu item to get to the Issues page.
- Clicking the green “Add” button on top right of the grid, enter some text for the issue (see Fig. 23), submit and close the form.
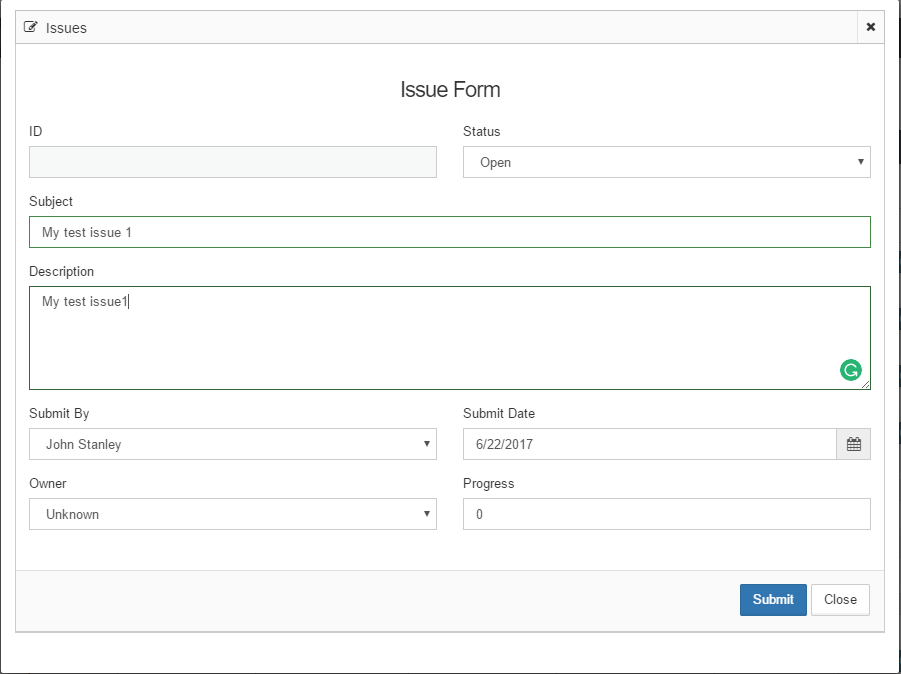 Fig.23: Create a new issue
Creating an issue raises the “IssueCreated” event to the workflow model, and new workflow instance starts to run.
Assign an owner to the issue
The workflow enters Started state which creates a task for users with the Manager role. To see the workflow task, you can sign in as the “demo2” user who has the Manager role. The password for “demo2” is “888”.
Once you signed in, click on “My Space” page where you can see the task created by the workflow (See Fig. 24).
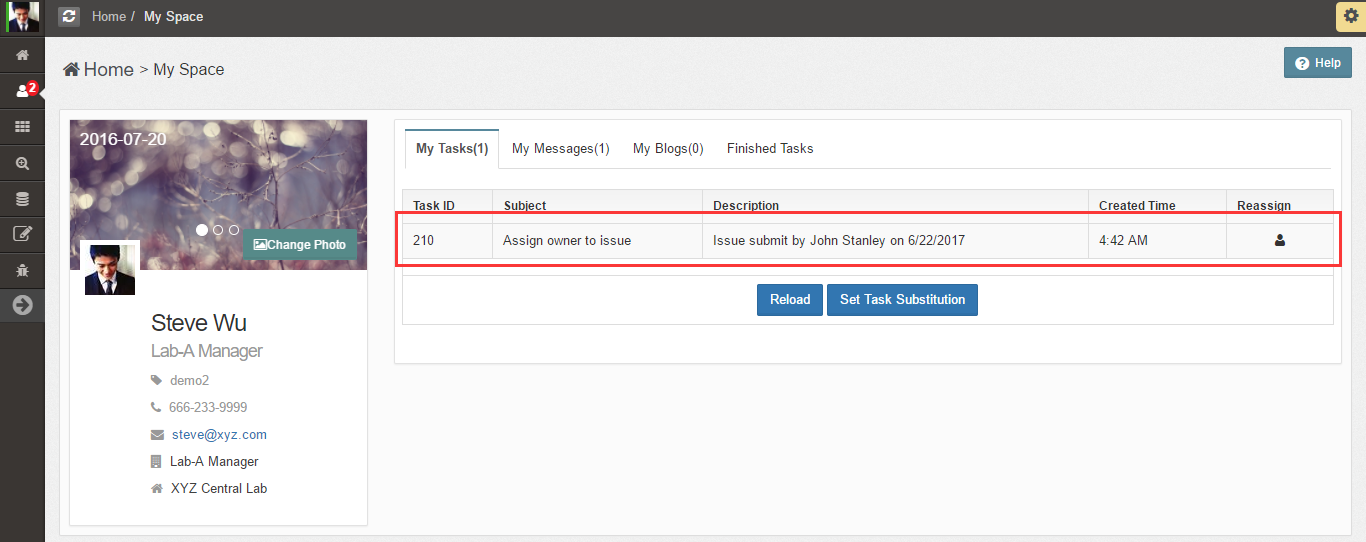 Fig.24: Workflow task list
Clicking on the task row brings up the issue form, select “Kevin Hart” as Owner, and then click on the “Assigned” button on the bottom (See Fig. 25).
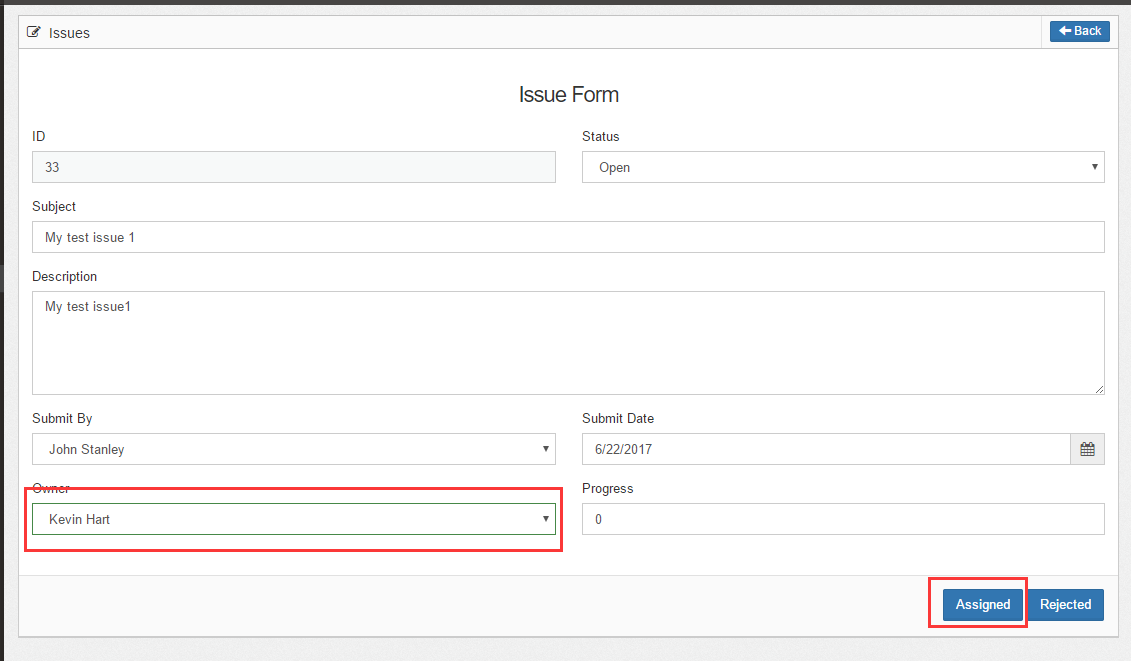 Fig.25: Task form for the issue owner
Clicking on the “Assigned” button executes the action that sets the issue’s Status to “Assigned”, raising “IssueAssigned” event to the workflow instance. The workflow is then transitioned to Working state. The task should disappear from the task list for “demo2”.
Fix the issue
The workflow enters Working state which creates a task for the appointed user whose username is “demo3”. Sign in as the “demo2” with the password “888”. You should see the task appearing on the top of the task list (See Fig. 26).
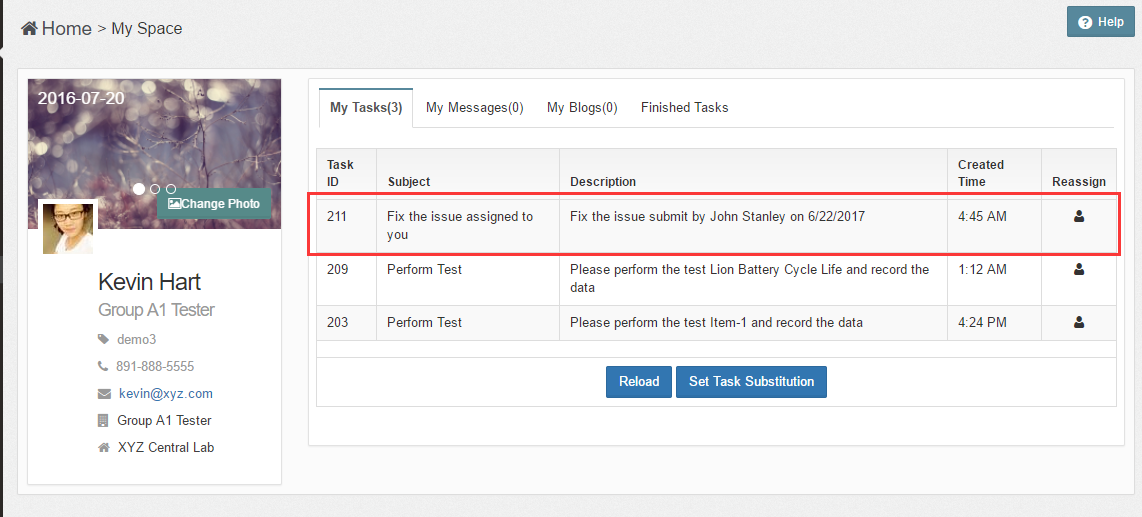 Fig.26: Workflow task for the owner
Clicking the task row takes you to the issue form, you can click on the “Fixed” button is supposed to end the process.
Conclusion
In this tutorial, you learned the basic concepts involved in creating and executing a state machine workflow. You saw that the first step in designing a workflow is to get an accurate view of the business process you are modeling. To create a more advanced workflow, you should go through the tutorials that cover the advanced topics of the Ebaas workflow.