Form Initialization, Autofill and Cascading Select Fields
Forms are a common way to collect data in enterprise applications. As an enterprise application platform, Ebaas has focused on making forms easy to build and simple to use. There are several form-related tutorials. This tutorial describes how to open a form with initial values and fill values automatically.
We are going to use the Issue Tracking application as an example, which is outlined in the “Build your first application with Ebaas” tutorial. If you haven’t read the post, I recommend you read it first.
Form Initialization
It is a common requirement that some of the fields in a form are initialized with values when opening a new form. For example, when you open the form for a new issue, you would like to have “Submit By”, “Submit Date” and “Status” initialized with Today’s date, your name, and “Open” status respectively. In Ebaas, you implement the logic of a form initialization in a data model.
Step 1: Open the DesignStudio
You launch the DesignStudio at Start->Ebaas->DesignStudio.
Step 2: Open the data model
Select the existing data model, named TDM, which contains the “Issues” class, log in as the admin user. The username for the admin user is “admin” and the default password is “admin” too.
Step 3: Implement an initialization code of the “Issues” class
Select the “Issues” class node under “Classes” node in the tree to view the settings of the class on the right.
Find the “Initialization Code” setting under “Methods” category, click on the button at the end of the input field to launch a code editor.
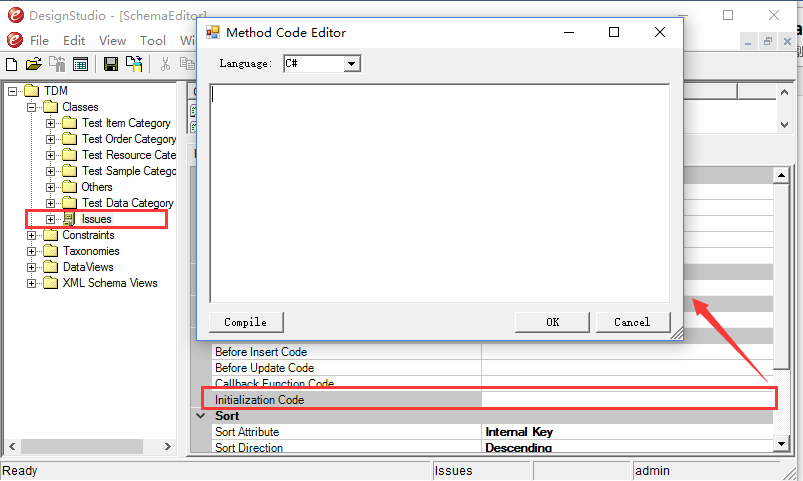 Fig. 1: Set up initialization logic for Issues
The code editor allows you to write initialization logic in C# code. It is not supposed to write a complex logic with lots of code in this place. For the issue form, you can enter the following lines of code in the editor, and click “OK” to compile and close.
this.Instance.SetValue("Status", "Open");
this.Instance.SetValue("SubmitDate", CurrentDate);
this.Instance.SetValue("SubmitBy", CurrentUser);
this.Instance.SetValue("Progress", 0);
where the code
this.Instance.SetValue(attributeName, attributeValue)is a way of setting a value to an attribute of an instance currently loaded in a form. The CurrentDate is a built-in function for getting Today’s date, and CurrentUser for getting the user who opens the form. Fig. 2 shows the editor containing the code.
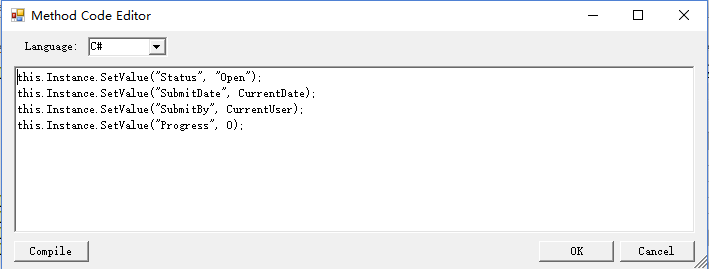 Fig. 2: Write code in the code editor
Step 3: Save the data model
Click the icon on the toolbar (see Fig. 4) to save the data model to the database.
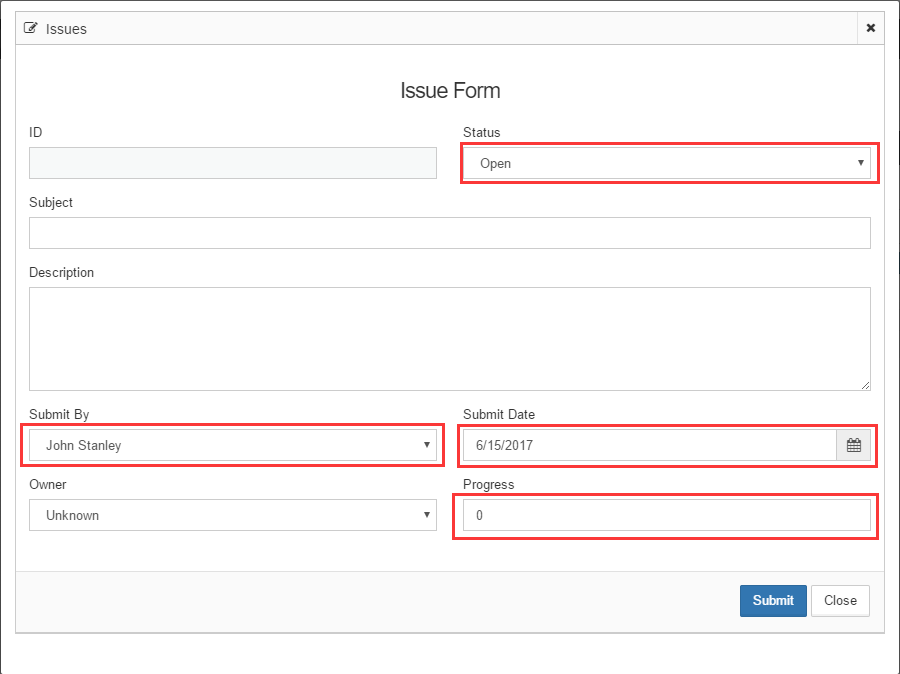 Fig. 3: Saving the data model to the database
Step 4: Test the form
First, use a recommended web browser to connect to the application at http: // localhost: 8080. You can use “demo1”, one of the demo accounts, to log in. The password for “demo1” user is “888”.
Next, click on the “Issue Tracking” menu item on the “Home” page to get to the page.
Click the green “Add” button on the top right to open a new issue, and you can see that a few fields have been initialized with values you set in the initialization code (See Fig. 4).
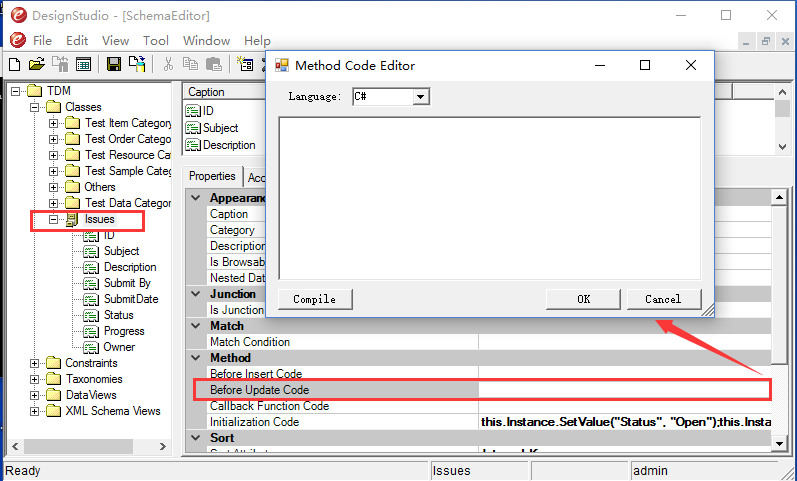 Fig. 4: A new form initialized with values
Note that you may have to restart the Ebaas server if you fail to observe the effects.
Form Autofill
Commonly, some of the fields in a form can be related logically, which means a change of a field may result in changes in some other fields. For example, you may want to have the value of the “Progress” change to 100 automatically when the “Status” of the issue is “Fixed”, rather than change it manually.
To meet this requirement, you implement the logic in a data model too.
Step 1: Implement the callback code
The right place to code this logic is the “Callback Function Code” of the “Issue” class.
Click the “Callback Function Code” setting to open the code editor, write the following code to the editor (See Fig. 5)
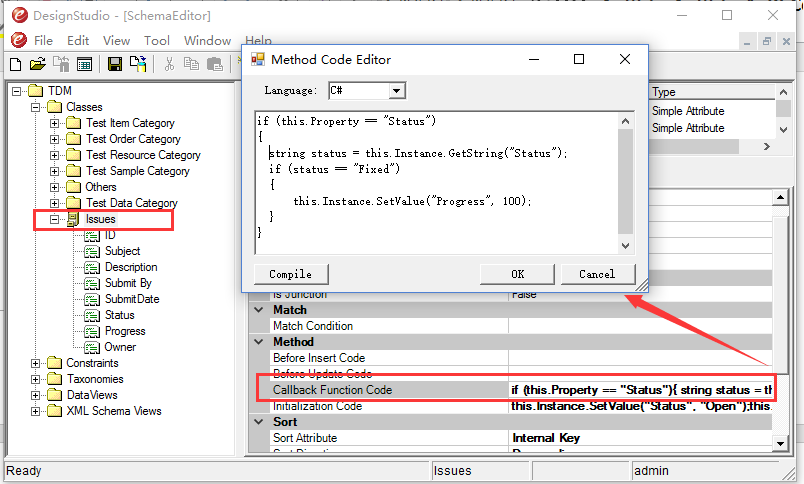 Fig. 5: Callback code
if (this.Property == "Status")
{
 string status = this.Instance.GetString("Status");
  if (status == "Fixed")
  {
      this.Instance.SetValue("Progress", 100);
  }
}
Where the code
if (this.Property == “Status”) makes sure that this block of code is executed if the callback is invoked by the event of a value change of the “Status” attribute.
Step 2: Enable callback on “Status” attribute
Next, you need to enable the callback on the “Status” attribute by setting the “Invoke Callback” to “True” (See Fig. 6).
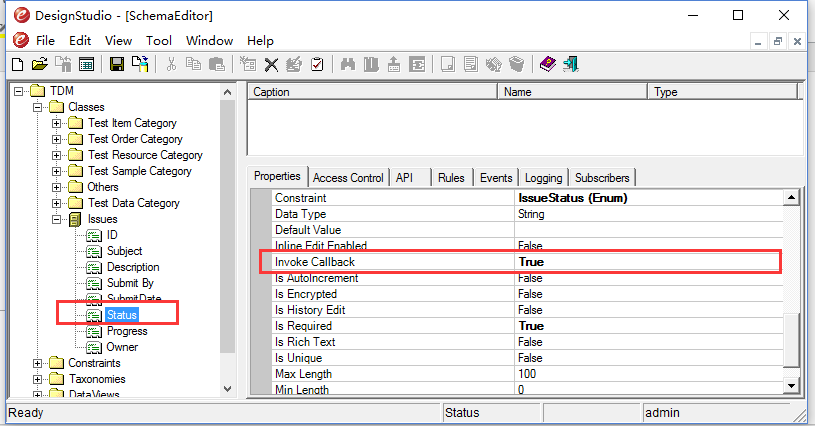 Fig. 6: Enabling callback on the attribute
Finally, save the updated data model to the database.
Step 3: Test the form
Now, go back to the “Issue Tracking” page, open the edit form for an existing issue, change the value of the “Status” to “Fixed”, the value of “Progress” is changed to 100. (See Fig. 7)
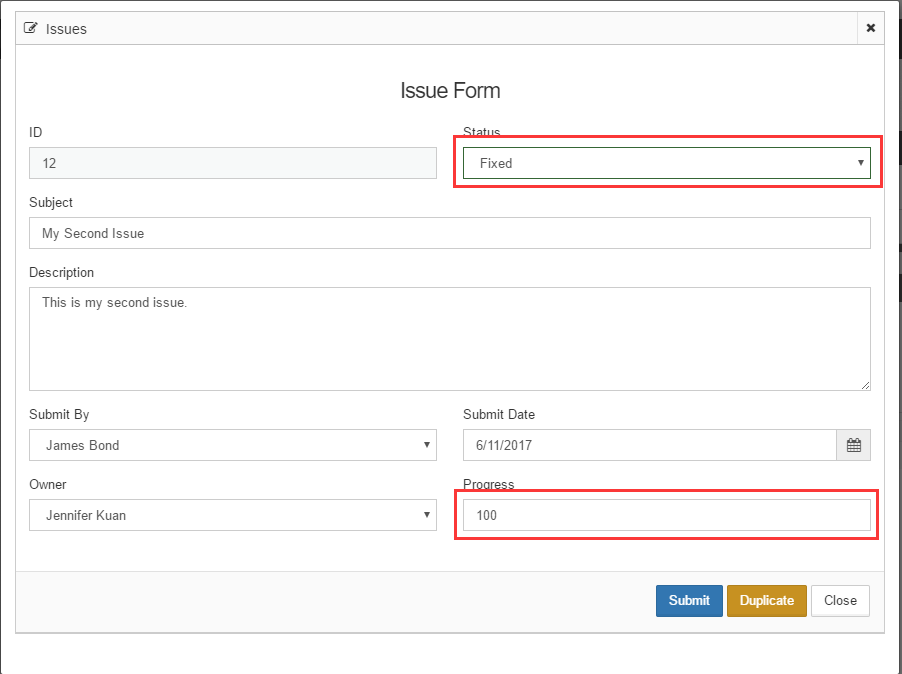 Fig. 7: Form autofill
Cascading Select Fields
The technique of the form initialization of autofill has made your form much easier to use, but you can further enhance it with the cascading select fields.
A cascading select field is a field with two or more levels of select lists. What you see in the second select list depends on what you chose in the first select list. This is obviously much better than having hundreds of options appear in a single select list.
With your Issue Form, you have made the “Owner” field a dropdown list which gives you a list of the registered users. If there is a significant number of the registered users in your application, it can be hard to locate a user from the drop-down list.
In an organization, users of the application belong to different units that form a hierarchy. It is a good idea to use the levels of an organization as the cascading select fields in a form.
Implementing Cascading select fields with programming is a very complicated task. But it is easy to set up the cascading fields using DesignStudio. This post guides you through the process.
Supposed that your organization structure is a three-level hierarchy. The root represents a testing center, there are several labs under it, and each lab has multiple groups. A registered user belongs to one of the groups.
In the form, you want to have three cascading select fields, the first one for choosing a lab, the second one for choosing a group, and the third one to choose a person as the owner of an issue. The options of the second field depend on the selection of the first one, and that of the third field depends on the selection of the second field.
Step 1: Create List constraints
In the “Build Your First Application” tutorial, you have learned to bind a List constraint to a field to show the list options dynamically generated. It is correct that you think of using List constraints for the cascading list fields. The difference this time is that you will set up the constraints with conditional queries. You need to create three List constraints, one for each cascading field.
The first List constraint you create returns a list of Labs under the test center. Since it is for the first level field, it doesn’t depend on any conditions. You can use the DesignStudio to create the constraint like one in Fig. 8.
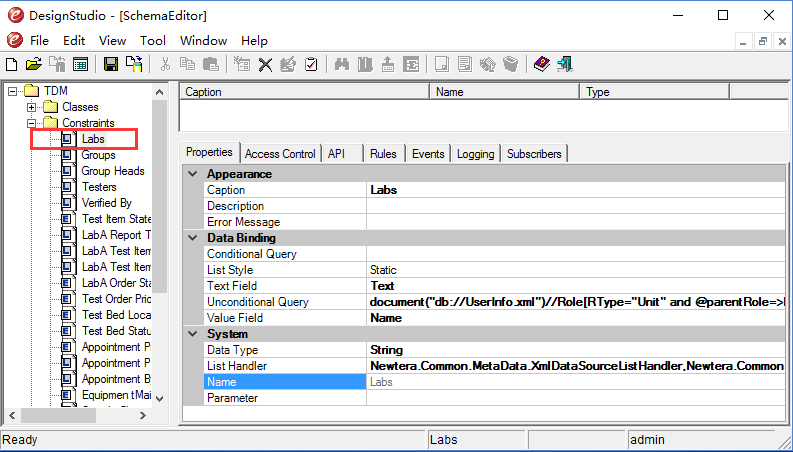 Fig.8: The List constraint for getting labs.
where the settings are described in the table below:
| Setting Name | Setting Value | Description |
|---|---|---|
| Name | Labs | A unique name of the constraint |
| DataType | String | Data type of the constraint values |
| List Handler | Newtera.Common.MetaData.XmlDataSourceListHandler, | |
| Newtera.Common | The program that generates the list options. The program uses an XQuery to get instances from a class in a data model | |
| List Style | Static | Indicate the list options don’t depend on the selection of other fields |
| Unconditional Query | document(“db://UserInfo.xml”)//Role[RType=”Unit” and @parentRole=>Role/Name = “Lab Center”] | The XQuery returns a list of items from the “Role” class whose RType is “Unit” and whose parent has a name of “Lab Center”. The data model is called “UserInfo”. |
| Text Field | Text | Indicate the attribute of the Role class whose value is for the display text of a list item |
| Value Field | Name | Indicate the attribute of the Role class whose value is the value of a list item |
The second List constraint you create returns a list of groups under the selected Lab in the first field. Since it is for the second level field, it depends on the selection of the first level field. The constraint you create likes one in Fig. 9.
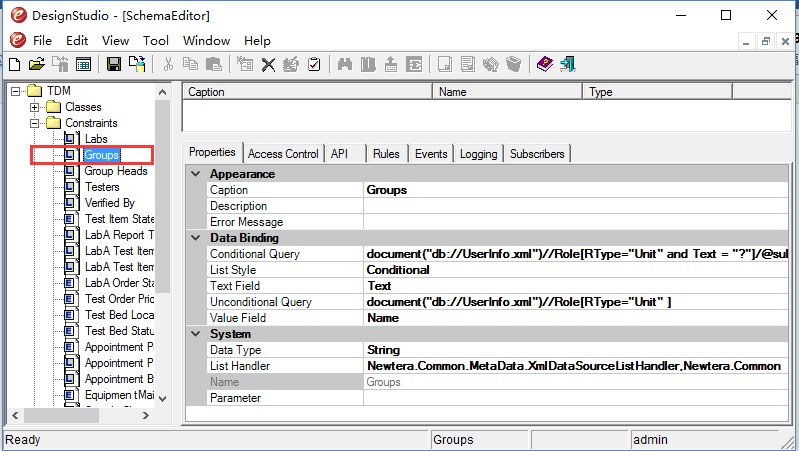 Fig.9: The List constraint for getting groups in a Lab
where the settings are described in the table below:
| Setting Name | Setting Value | Description | |
|---|---|---|---|
| Name | Labs | A unique name of the constraint | |
| DataType | String | Data type of the constraint values | |
| List Handler | Newtera.Common.MetaData.XmlDataSourceListHandler, | ||
| Newtera.Common | The program that generates the list options. The program uses an XQuery to get instances from a class in a data model | ||
| List Style | Conditional | Indicate the list options depend on the selection of other fields | |
| Unconditional Query | document(“db://UserInfo.xml”)//Role[RType=”Unit” ] | The XQuery that returns a list of items from the “Role” class whose RType is “Unit”. This query returns all possible options | |
| Conditional Query | document(“db://UserInfo.xml”)//Role[RType=”Unit” and Text = “?”]/@subRoles=>Role | The XQuery returns a list of items depending on the selected parent item | |
| Text Field | Text | Indicate the attribute of the Role class whose value is for the display text of a list item | |
| Value Field | Name | Indicate the attribute of the Role class whose value is the value of a list item |
The third List constraint you create returns a list of users belong to the selected group in the second field. The constraint you create likes one in Fig. 10.
 Fig.10: The List constraint for getting users in a group
where the settings are described in the table below:
| Setting Name | Setting Value | Description |
|---|---|---|
| Name | Labs | A unique name of the constraint |
| DataType | String | Data type of the constraint values |
| List Handler | Newtera.Common.MetaData.XmlDataSourceListHandler, | |
| Newtera.Common | The program that generates the list options. The program uses an XQuery to get instances from a class in a data model | |
| List Style | Conditional | Indicate the list options depend on the selection of other fields |
| Unconditional Query | document(“db://UserInfo.xml”)//User The XQuery that returns a list of items from the “User.” | This query returns all possible options |
| Conditional Query | for $u in document(“db://UserInfo.xml”)//Role[RType=”Unit” and Text=”?”]/@users=>UserRole/@user=>User return $u | The XQuery returns a list of items depending on the selected group item |
| Text Field | Display Text | Indicate the attribute of the User class whose value is for the display text of a list item |
| Value Field | ID | Indicate the attribute of the User class whose value is the value of a list item |
Step 2: Create Cascading Attributes
Next, you can create three attributes in the “Issue” class, which is “Assigned Lab”, “Assigned Group” and “Assigned Owner” respectively.
You create the “Assigned Owner” attribute as the one in Fig. 11.
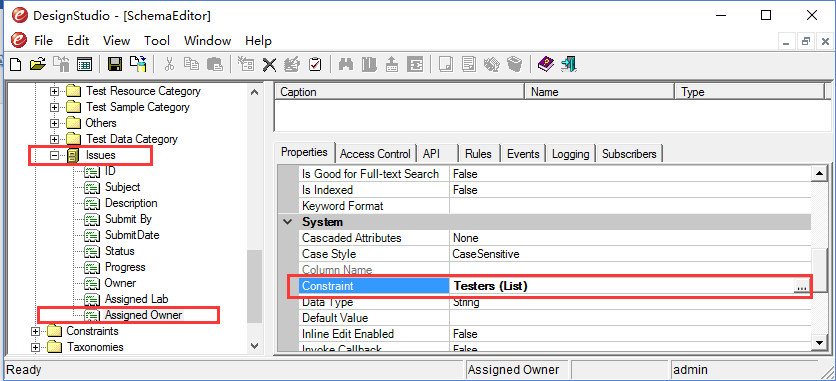 Fig.11: The “Assigned Owner” attribute
where the “Assigned Owner” is bound to the “Testers” constraint.
Then, create the “Assigned Group” attribute as one in Fig. 12.
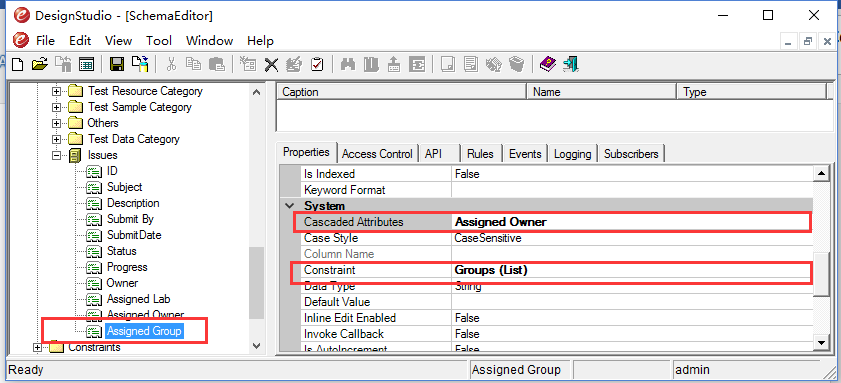 Fig.12: The “Assigned Group” attribute
where the “Assigned Group” is bound to the “Groups” constraint.
You need to select the “Assigned Owner” attribute as one of its “Cascaded Attributes.”
Then, create the “Assigned Lab” attribute as one in Fig. 13.
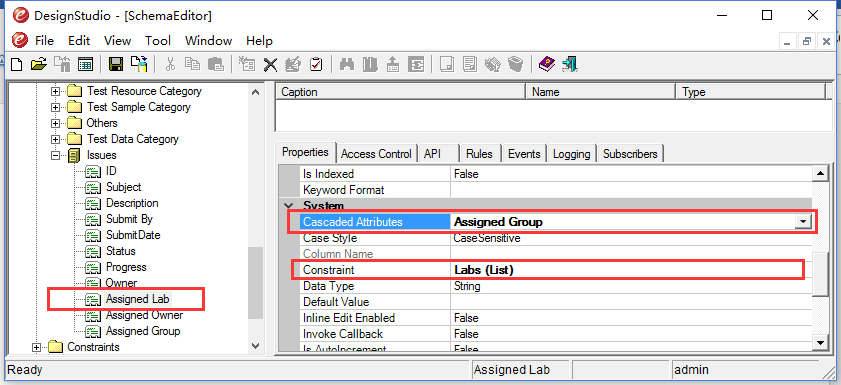 Fig.13: The “Assigned Lab” attribute
where the “Assigned Lab” is bound to the “Labs” constraint. Select the “Assigned Group” attribute as one of its “Cascaded Attributes”.
Finally, Save the model to the database.
Step 3: Modify the form
Use a browser to open the default form that was built in “Build Customized Form” tutorial, add the “Assigned Lab,” “Assigned Group” and “Assigned Owner” fields to the form as shown in Fig. 14.
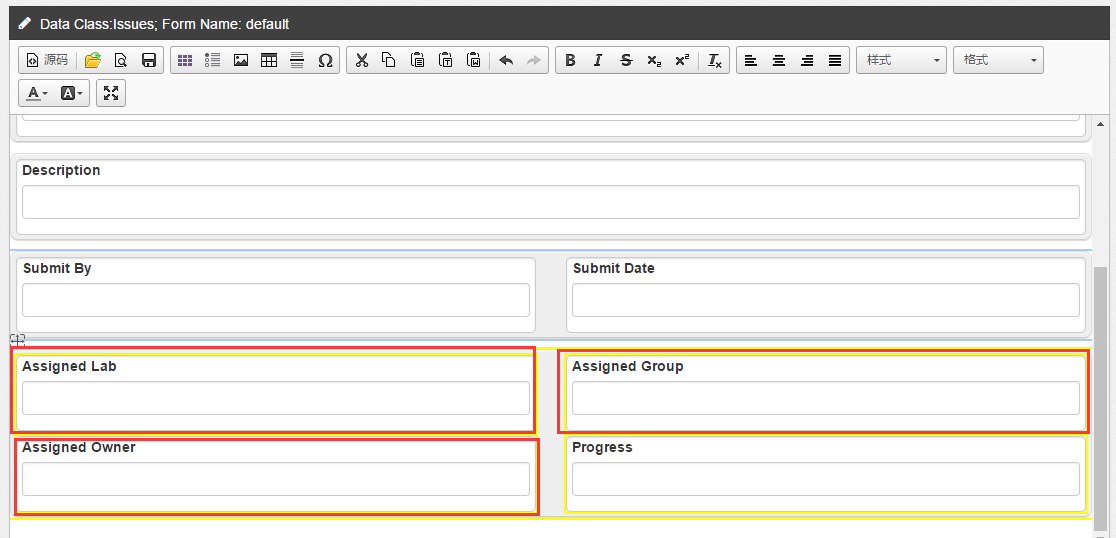 Fig.14: Adding Cascading List Fields to the form
After saving the form, you can preview the form to check if the cascading list fields work (See Fig. 15).
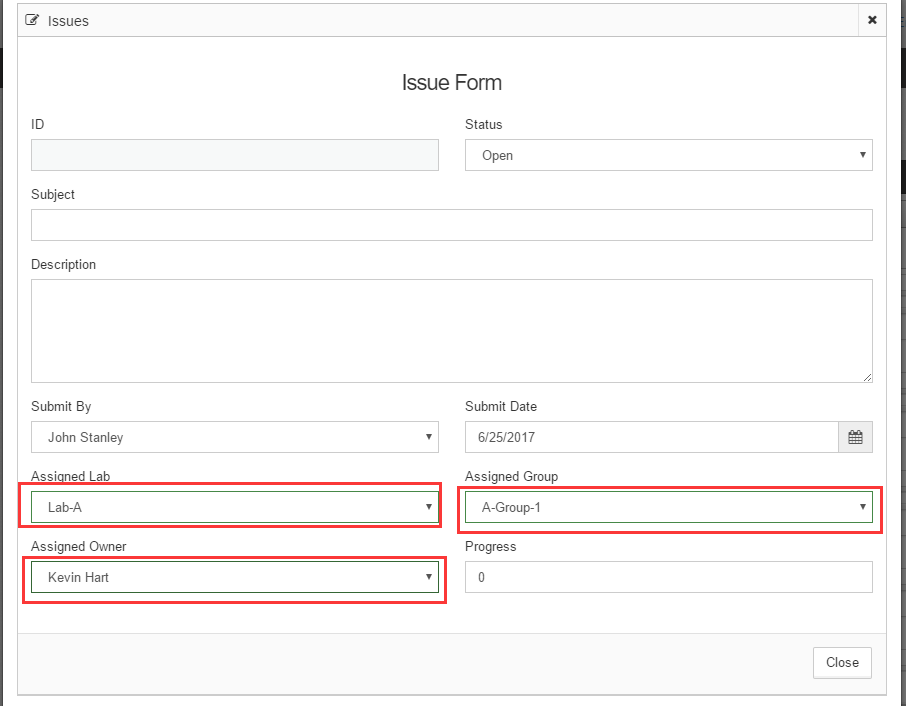 Fig.15: Testing the cascading effect
The example mentioned above shows how you can use the conditional list constraints to set up cascading fields. You can apply this method to implement other use cases.
Conclusion
I have briefly described how to implement form initialization, autofill and cascading select fields. There are more advanced features, such as sequence number generation, embedded tables, and more, which will be described in other topics.